Link a source

Last updated:

|Edit this page

The PostHog data warehouse enables you to link your most important data into PostHog from sources like your CRM, payment processor, or database. Once linked, you can combine this data with the product analytics data already in PostHog and query across all of it.

You can link a source to PostHog by either using one of our pre-built connectors below or by creating a custom source.

The data warehouse is currently in beta. To access it, enable the feature preview in your instance. It is free to use during the beta period.

Stripe

The Stripe connector can link charges, customers, invoices, prices, products, subscriptions, and balance transactions to PostHog.

To link Stripe:

  1. Go to the data warehouse tab in PostHog
  2. Click "Link Source" and select Stripe
  3. Get your Account ID from your Stripe user settings under Accounts then ID
  4. Get your Client Secret from your Stripe API keys under Standard keys then Secret key
  5. Add both of these to PostHog (and optionally a table name prefix) and click "Link"

The data warehouse then starts syncing your Stripe data. You can see details and progress in the data warehouse settings tab.

Hubspot

The Hubspot connector can link contacts, companies, deals, emails, meetings, quotes, and tickets to PostHog.

To link Hubspot:

  1. Go to the data warehouse tab in PostHog
  2. Click "Link Source" and select Hubspot
  3. Select the Hubspot account you want to link and click "Connect app"
  4. Optional: Add a prefix to your table names

The data warehouse then starts syncing your Hubspot data. You can see details and progress in the data warehouse settings tab.

Postgres

The Postgres connector can link your database tables to PostHog.

To link Postgres:

  1. Go to the data warehouse tab in PostHog
  2. Click "Link Source" and select Postgres
  3. Enter your database connection details:
    • Host: The hostname or IP your database server like db.example.com or 192.168.1.100.
    • Port: The port your database server is listening to. The default is 5432.
    • Database: The name of the database you want like analytics_db.
    • User: The username with the necessary permissions to access the database.
    • Password: The password for the user.
    • Schema: The schema for your database where your tables are located. The default is public.
  4. Click "Link"

The data warehouse then starts syncing your Postgres data. You can see details and progress in the data warehouse settings tab.

Linking a custom source

The data warehouse can also link to data in your object storage system like S3 or GCS. To start, you'll need to:

  1. Create a bucket in your object storage system
  2. Set up an access key and secret
  3. Add data to the bucket (we'll use Airbyte)
  4. Create the table in PostHog

These docs are written for AWS S3 using Airbyte, but you can also use Google Cloud Storage (GCS) and Fivetran, Stitch, or other ETL tools.

Step 1: Creating a bucket in S3

  1. Log in to AWS.
  2. Open S3 in the AWS console and create a new bucket. We suggest us-east-1 if you're using PostHog Cloud US, or eu-central-1 if you're using PostHog Cloud EU.

created bucket

Make sure to note both the name and region of your bucket, we'll need these later.

Step 2: Set up access policy and key

Next, we need to create a new user in our AWS console with programmatic access to our newly created bucket.

  1. Open IAM and create a new policy to enable access to this bucket
  2. On the left under "Access management," select "Policies," and click "Create policy"
  3. Under the service, choose "S3"
  4. Under "Actions," select:
    1. "Write" -> "PutObject"
    2. "Permission Management" -> "PutObjectAcl"
  5. Under "Resources," select "Specific," and click "object" -> "Add ARN"
  6. Specify your bucket name and choose "any" for the object name. In the example below, replace posthog-s3-export with the bucket name you chose in the previous section

bucket arn config

  1. Your config should now look like the following

policy overview

  1. Click "Next" until you end up on the "Review Policy" page
  2. Give your policy a name and click "Create policy"

The final step is to create a new user and give them access to our bucket by attaching our newly created policy.

  1. Open IAM and navigate to "Users" on the left
  2. Click "Add Users"
  3. Specify a name and make sure to choose "Access key - Programmatic access"

create user

  1. Click "Next"
  2. At the top, select "Attach existing policies directly"
  3. Search for the policy you just created and click the checkbox on the far left to attach it to this user

attaching the policy to our newly created user

  1. Click "Next" until you reach the "Create user" button. Click that as well.
  2. Make sure to copy your "Access key" and "Secret access key". The latter will not be shown again.

showing our newly created api key and secret key

Step 3: Add data to the bucket

For this section, we'll be using Airbyte. However, we accept any data in CSV or Parquet format, so if you already have data in S3 you can skip this section.

  1. Go to Airbyte and sign up for an account if you haven't already.
  2. Go to connections and click "New connection"
  3. Select a source. For this example, we'll grab data from Stripe, but you can use any of Airbyte's sources.
  4. Click "Set up a new destination"
  5. Select "S3" as the destination
  6. Fill in the "S3 Bucket Name", "S3 Bucket Region" with the name and region you created earlier.
  7. For "S3 Bucket Path", use airbyte.
  8. For the "Output Format", pick Parquet. You can use the default settings
  9. Under "Optional fields", you'll want to add the access key and secret from step 1.
  10. In the next step, pick the streams you want to fill. Given you'll manually need to create a table for each stream, we suggest being selective.
  11. Wait for the sync to finish

creating the s3 destination

Step 4: Create the table in PostHog

  1. In PostHog, go to the "Data Warehouse" tab and click "New table"
  2. Fill in the table name.
  3. For the URL pattern, copy the URL from S3, up to the bucket name. Replace the file name with *, as Airbyte will split larges streams out into multiple files.
  • For example: https://your-bucket.s3.amazonaws.com/airbyte/invoices/*
  1. For file format, select Parquet. Fill in the access key and secret key.

You'll want to repeat this step for each "stream" or folder that Airbyte created in your S3 bucket.

creating table in posthog

Step 5: Query the table.

Amazing! You can now query your new table.

Syncing

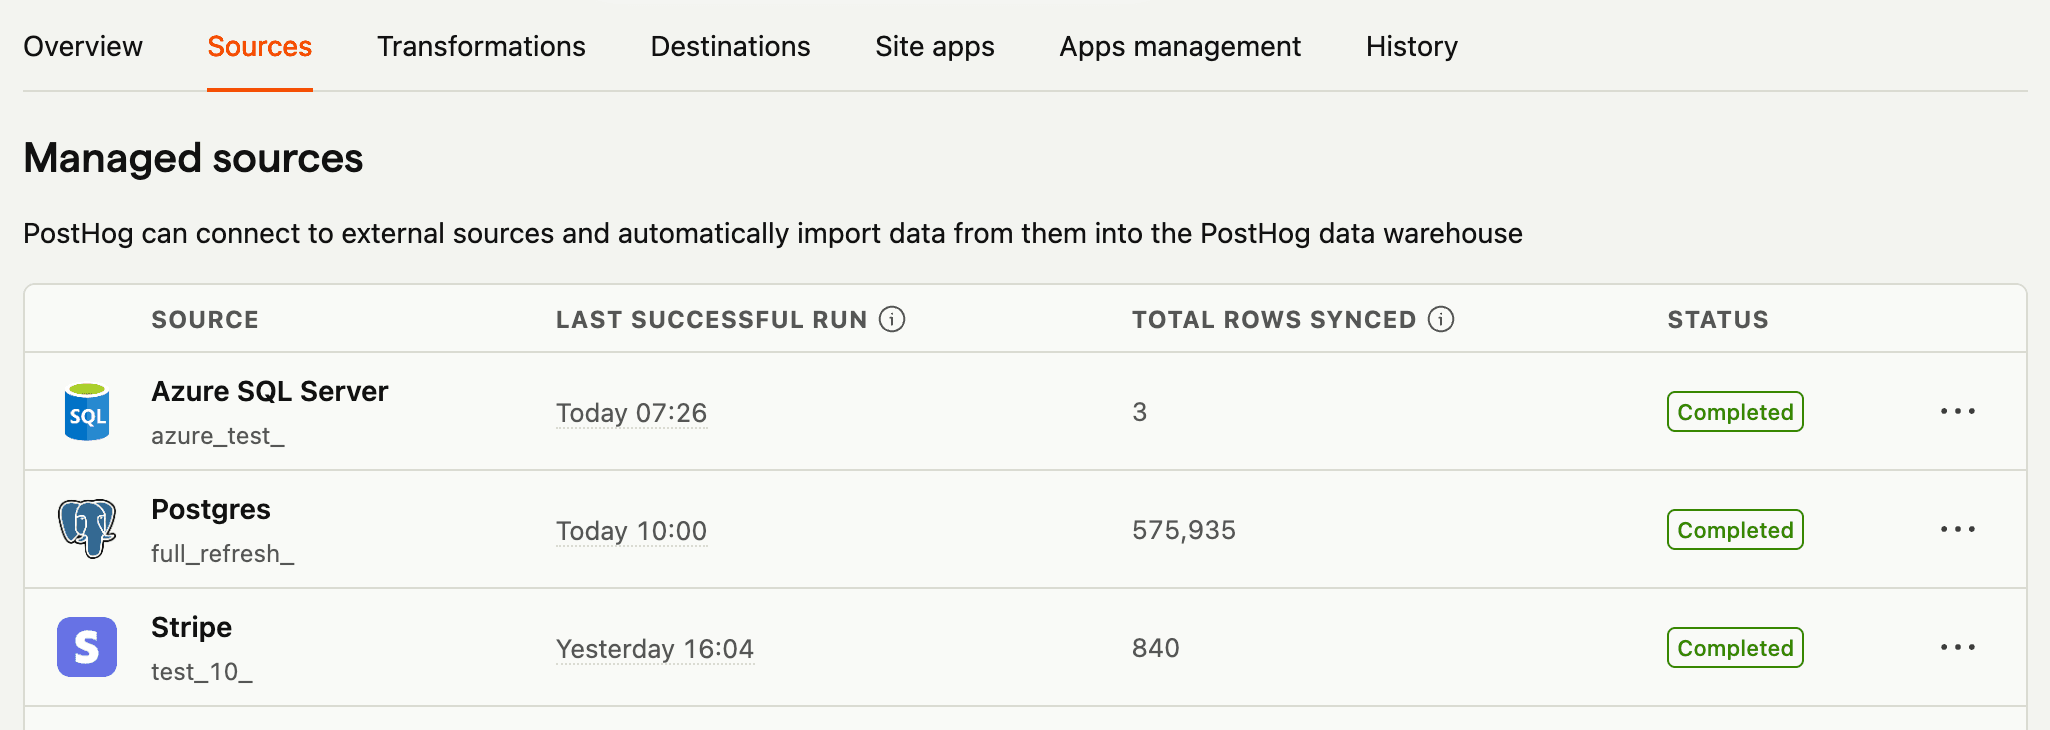
Once you add a source, you can see its status, sync frequency, and last successful run in the data warehouse settings page. You can also reload or delete sources here.

When you expand each source, you can see:

  • Schema name
  • Enable or disable syncing for that table
  • Synced table name in PostHog
  • Time the table was last synced
Data warehouse settings in PostHog

Questions?

Was this page useful?

Next article

Query your sources

To see all of the sources available to query, go to the data warehouse tab . This page shows all the external and PostHog tables you can query through SQL insights along with saved views. Click on any of the tables, and then click "Query" to open an SQL insight. Querying sources To start with querying your sources: Choose a table and click "Query" or create a new SQL insight . If you didn't already, choose a table to query FROM like stripe_charge or hubspot_contacts Write your SQL query…

Read next article