

Targeting feature flags on groups, pages, machines, and more
Contents
To decide what value to return, PostHog’s feature flag service uses a flag key and an entity. Which entity to use it up to you, and these don't necessarily need to be users – you can also target organizations, pages, machines, and more.
This tutorial shows you how to target these non-user entities in your use of feature flags.
Targeting groups, teams, or organizations
If you enabled group analytics and set up group identification, targeting by groups, teams, or organizations is easy. When creating your feature flag, make sure Properties is selected as the top-level targeting mode under Release conditions. Then, on each condition set, use the Target by dropdown to select your group type name, add any conditions you want, and roll out the flag.

Property or cohort filter
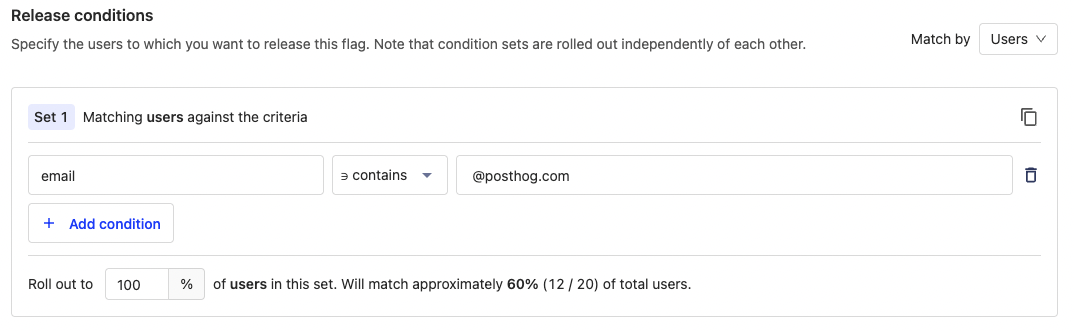
Another way to target an organization or team is to use the email or similar repeated identifier of a user. This enables you to filter for groups without using group analytics. Similarly, you can create a cohort for the organization, then use that as a condition.
Targeting pages
Another target you might want is pages. For example, to ensure components are consistent across a set of pages, test a new pricing page, or customize a page's experience based on how many times it has been viewed.
Payloads
You can use feature flag payloads to customize the experience depending on the page. For example, if you want a button to change colors depending on the page URL. Payloads lets you set multiple values on one feature flag which you can evaluate and use in your app.
To do this, create your flag with a payload such as:
In your app, get feature flag payloads, write logic to check the page URL, and use a combination of the page URL and flag payload to adjust your button. For a Next.js component, this would look like this:
Cohort
If instead, you want to target users who visited a page repeatedly, you can create and use a static cohort. For example, if you wanted to target a flag to show a new pricing page for people who have visited the pricing page repeatedly.
- Create a cohort for people who had multiple pageview events
- Duplicate as a static cohort.
- Use the static cohort as a condition for your feature flag
Why can’t I use a behavioral cohort directly? Calculating a behavioral (based on events) cohorts is slow. Feature flags care about speed. Adding behavioral cohorts to flag evaluation would significantly slow them down. Read a full explanation in our docs.
Targeting services, machines, devices, applications
Another entity you might want to target is services, machines, or devices. For example, you might want to roll out a canary release to some of your servers or activate a flag in one region but not another.
Custom user value
A user in PostHog is just a distinct ID string connected to events. Although on the frontend, it is generated and connected to a real user's sessions, on the backend it could represent anything. This means you can use service, machine, device, or application IDs as the distinct ID and feature flags will still work with them this way.
To do this, start by capturing an event with the entity ID (like server ID).
Next, create a feature flag and roll it out to match the properties of your desired servers. In this case, server_id equals canada-cloud-1.
Finally, add your feature flag call using your server ID:
Now, you can target your server with feature flags. You can use a similar workflow with services, machines, or devices as well as any of our other backend SDKs or even our API.
One-time property value
A common pattern we use for many of our site apps is to show a feature, set a property on the user once the "business code" executes, and check for that property to not show again. This pattern is useful if you want interactions with features or services to only happen once.
📖 Read a full implementation of this in "How to set up one-time feature flags."
To do this, create a flag where is_first_interaction is not false.
Next, implement the flag and add a capture call after the flag to flip the is_first_interaction property.
The flag now returns false, meaning the user gets a different experience on all subsequent interactions.