


How to run a fake door test

Contents
A fake door test is when you create a "fake" UI or experience for a product or feature you are thinking of building. When users interact with it, you tell them it isn't available (yet). This enables you determine if your users would actually be interested in your new feature.
This tutorial shows you how to set up a fake door test with PostHog. We'll build a basic app, set up a fake door test, and then implement surveys to get more feedback.
Note: Fake door tests have risks. Showing users something non-existent could disappoint them and hurt your reputation. Make sure to be honest and transparent with users about what you are doing.
Creating an app and adding PostHog
We are going to build a basic app to run our fake door test on. We do this with Next.js, which requires installing Node. After doing so, run the command below, select No for TypeScript, Yes for use app router, and the defaults for every other option.
After doing this, go into your newly created fake-door folder and install posthog-js.
After installing posthog-js, set up the PostHog initialization. This requires going to our app folder, creating a providers.js file, adding our PostHog initialization behind a window check, and creating a provider component like this:
With our PHProvider component created, we can import it and wrap our main app in it in layout.js.
With this done, PostHog starts autocapturing events and our app is ready for a fake door test.
Creating our fake door test
Our fake door test is simple. We'll add a button to our app that says "Try our new feature" and it takes you to a page that says "This feature is coming soon" which we will create later.
With just this set up, we can run the development server with the command npm run dev, go to our app, and click the button a few times. This captures events in PostHog.
Once we capture that data in PostHog, we can set up an action for our fake door test. To do this:
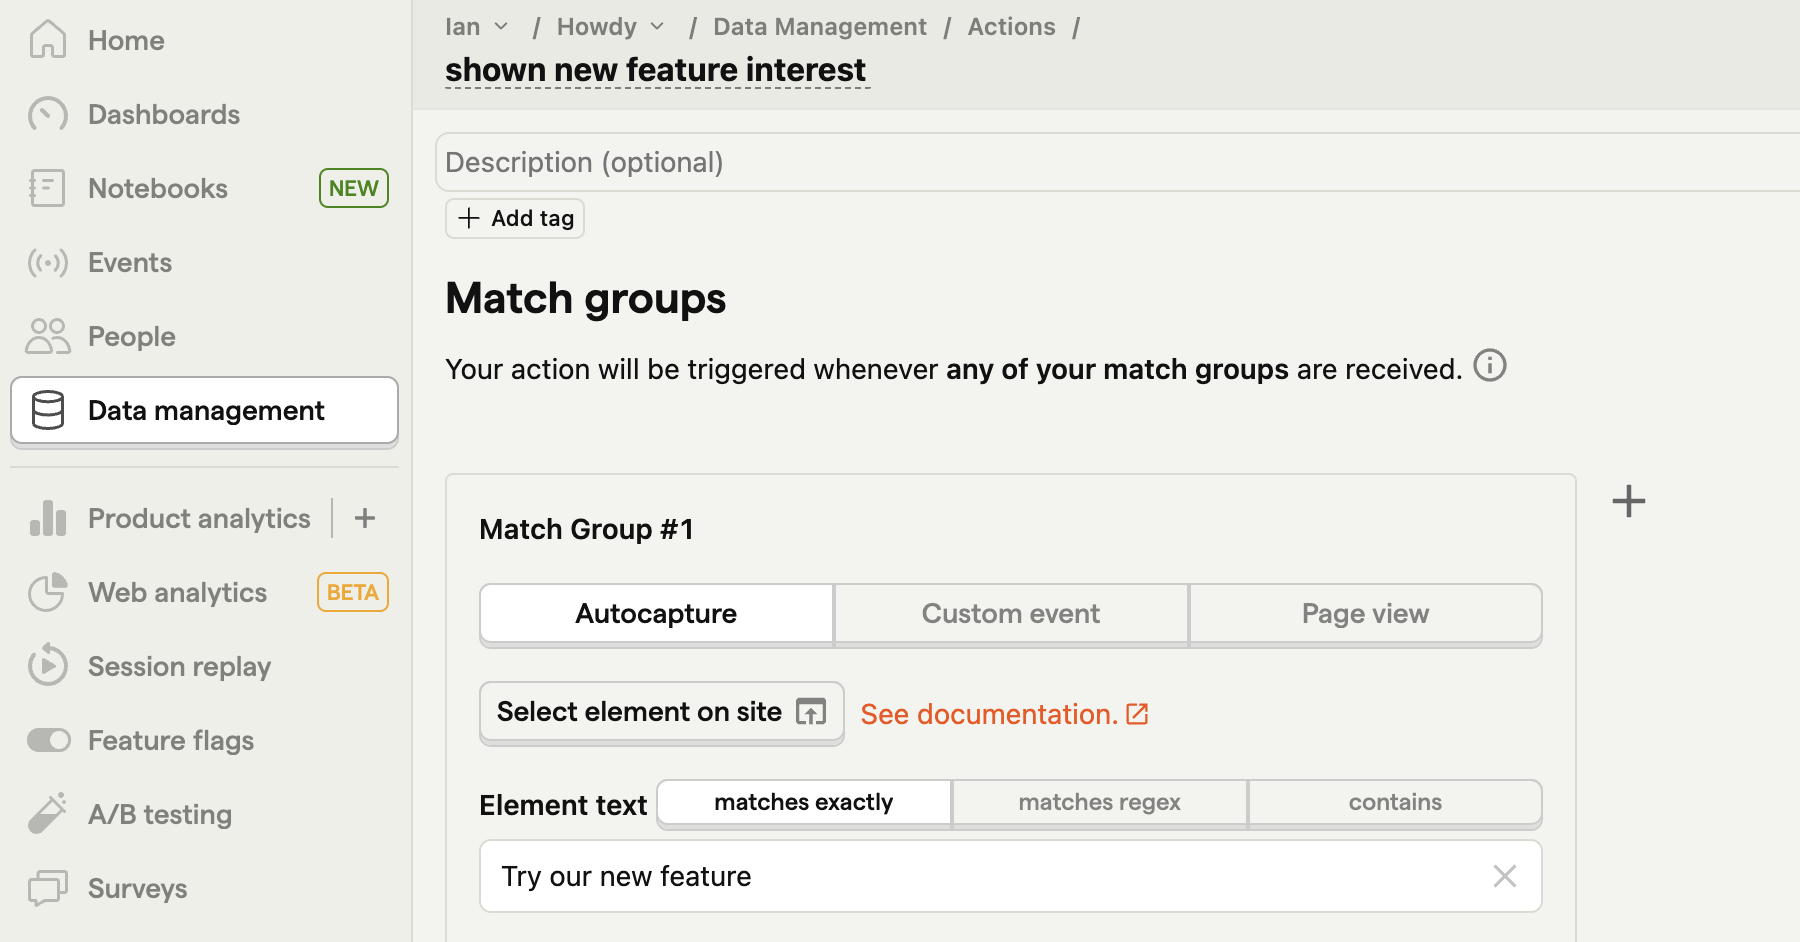
- Go to the data management, click the action tab, and then click "New action."
- Select option to create "From event or pageview."
- Name your action "shown new feature interest."
- Select "Autocapture" as our "Match Group #1," and then match the element text "Try our new feature" exactly.
- Press save.
This tracks the number of button clicks, enabling you to track the success of your fake door test and interest in your feature.
Bonus idea: You can use feature flags to show your fake door test to a targeted subset of users. This lowers reputation risk and enables you to get more targeted feedback.
Adding a survey to our fake door test
Since the goal of a fake door test is to validate interest, we can get even more feedback by adding a survey.
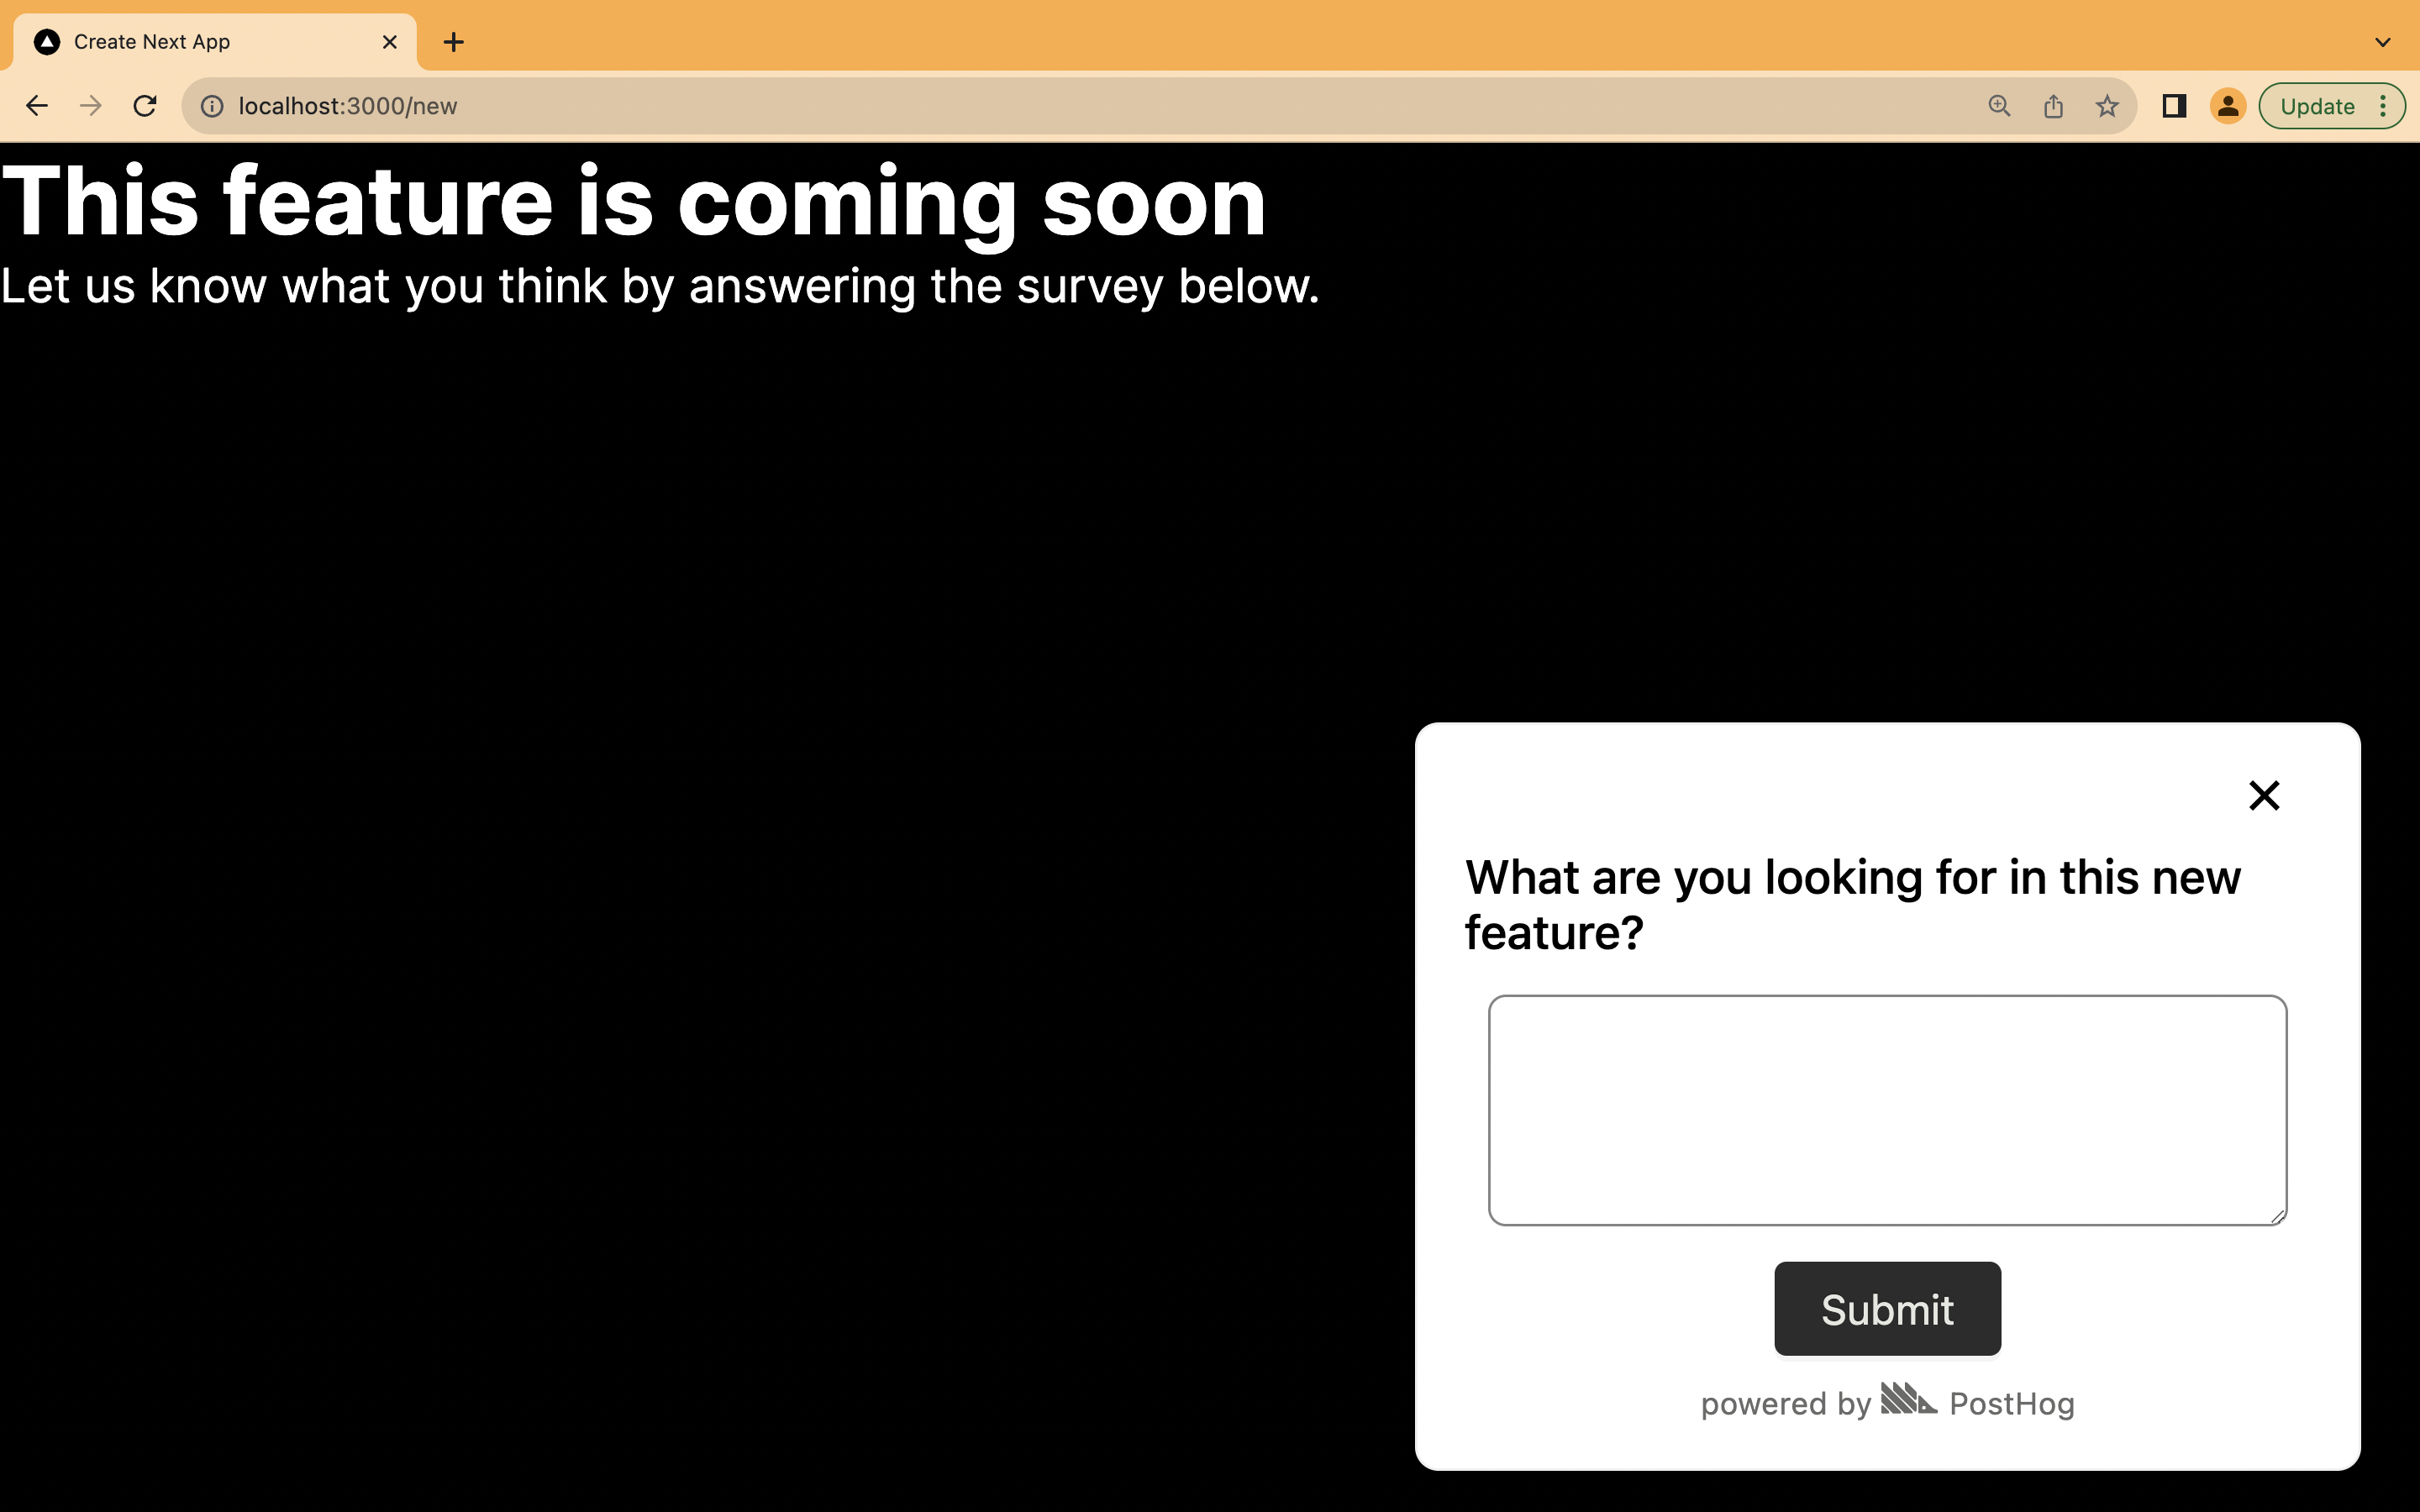
We'll implement this in our example by navigating the user to a new page when they click the button and asking them a survey question.
To do this, create another folder named new in our app folder and a file named page.js in this folder. In this file, we'll create a basic page with our survey question.
Next, we can set up the survey we mention. To do this, go to the surveys tab in PostHog and click "New survey." Here you can fill out the details of your survey:
- Add a name like "New feature."
- Add a question like "What are you looking for in this new feature?"
- Add a target on URLs containing
/new. - Click "Save as draft."
Don’t want a popover? You can learn how to implement an integrated, custom survey component in our "How to create custom surveys" tutorial.
Once done, we can go back to our draft survey and press "Launch." Now, users who visit the /new page get a survey so we can get further validation on our fake door test. PostHog saves survey responses which you can use to guide your feature development.
Further reading
- The Product-Market Fit Game
- Get feedback and book user interviews with surveys
- How we build features users love (really fast)
Subscribe to our newsletter
build mode
Read by 75,000+ founders and builders
We'll share your email with Substack
PostHog is the leading platform for building self-driving products. With a full suite of developer tools – AI observability, product analytics, session replay, feature flags, experiments, error tracking, logs, and more – PostHog captures all the context agents need to diagnose problems, uncover opportunities, and ship fixes. A data warehouse and CDP tie it all together, unifying that context into one source agents can read across. You can steer it all from Slack, the web app, the desktop (PostHog Desktop), or your own editor via the MCP.