Surveys
We'll create a basic Next.js app, add PostHog, create a survey, and then show you how to display the survey in the app and get responses.
Already have a Next.js app? Skip to adding PostHog
First, make sure Node is installed
npx create-next-app@latest
Name it whatever you like (we call ours next-surveys). Select No for TypeScript, Yes for use app router, No for Tailwind CSS and the defaults for every other option.
Next, replace the placeholder code in app/page.js with the following:
// app/page.js
'use client'
import styles from './page.module.css'
export default function Home ( ) {
return (
< main className = { styles . main } >
< div className = "App" >
< h1 > This is our Next . js survey tutorial < / h1 >
< / div >
< / main >
)
}
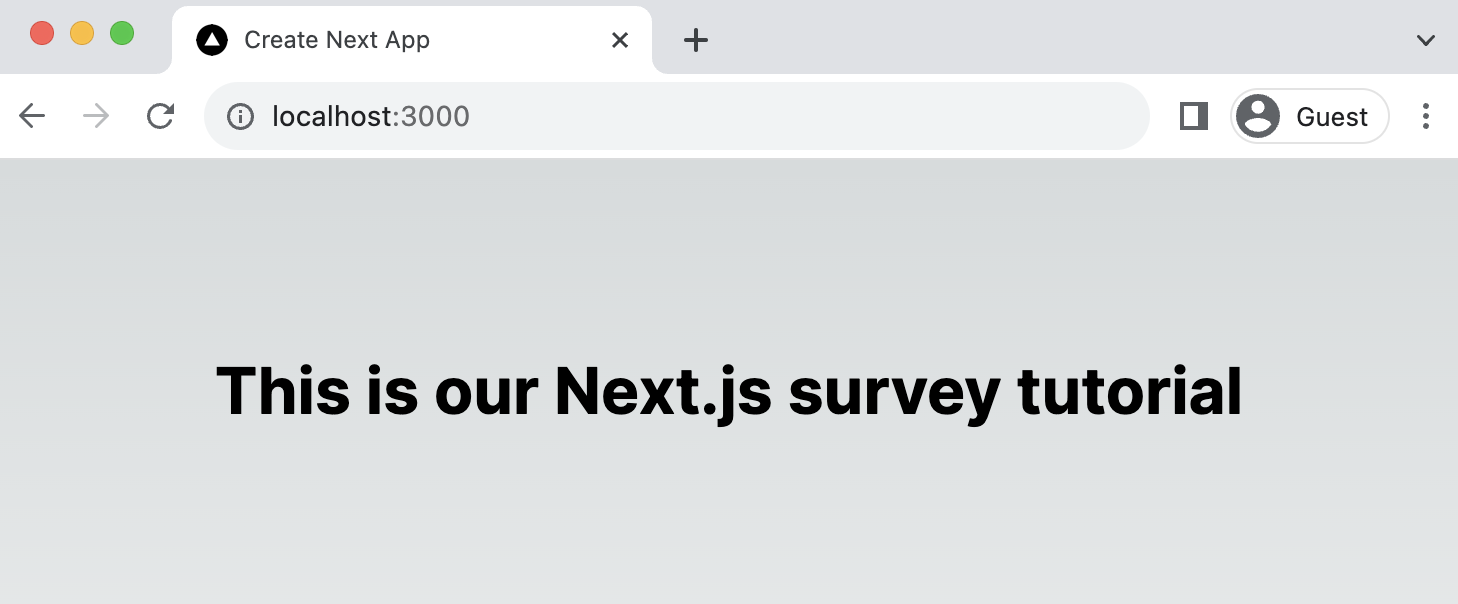
Finally, run npm run dev and go to http://localhost:3000 to see our new homepage.
We'll use PostHog to create and control our survey as well as monitor results. If you don't have a PostHog instance, you can sign up for free here
First, set up PostHog for use on the client-side JavaScript React SDK
npm install posthog-js @posthog/react
Then integrate PostHog by creating a providers.js file in your app folder and exporting a PHProvider component:
// app/providers.js
'use client'
import posthog from 'posthog-js'
import { PostHogProvider } from '@posthog/react'
import { useEffect } from 'react'
export function PHProvider ( { children } ) {
useEffect ( ( ) => {
posthog . init ( '<ph_project_token>' , {
api_host : 'https://us.i.posthog.com' ,
defaults : '2026-05-30' ,
} )
} , [ ] ) ;
return < PostHogProvider client = { posthog } > { children } < / PostHogProvider >
}
Once created, you can import PHProvider into your layout.js file and wrap your app with it:
// app/layout.js
import './globals.css'
import { PHProvider } from './providers'
export default function RootLayout ( { children } ) {
return (
< html lang = "en" >
< PHProvider >
< body > { children } < / body >
< / PHProvider >
< / html >
)
}
There are two options for displaying a survey using PostHog:
Use PostHog's prebuilt survey UI. Implement your own survey UI. This tutorial will cover how to implement both options:
This is the simplest option. PostHog has a variety of survey types
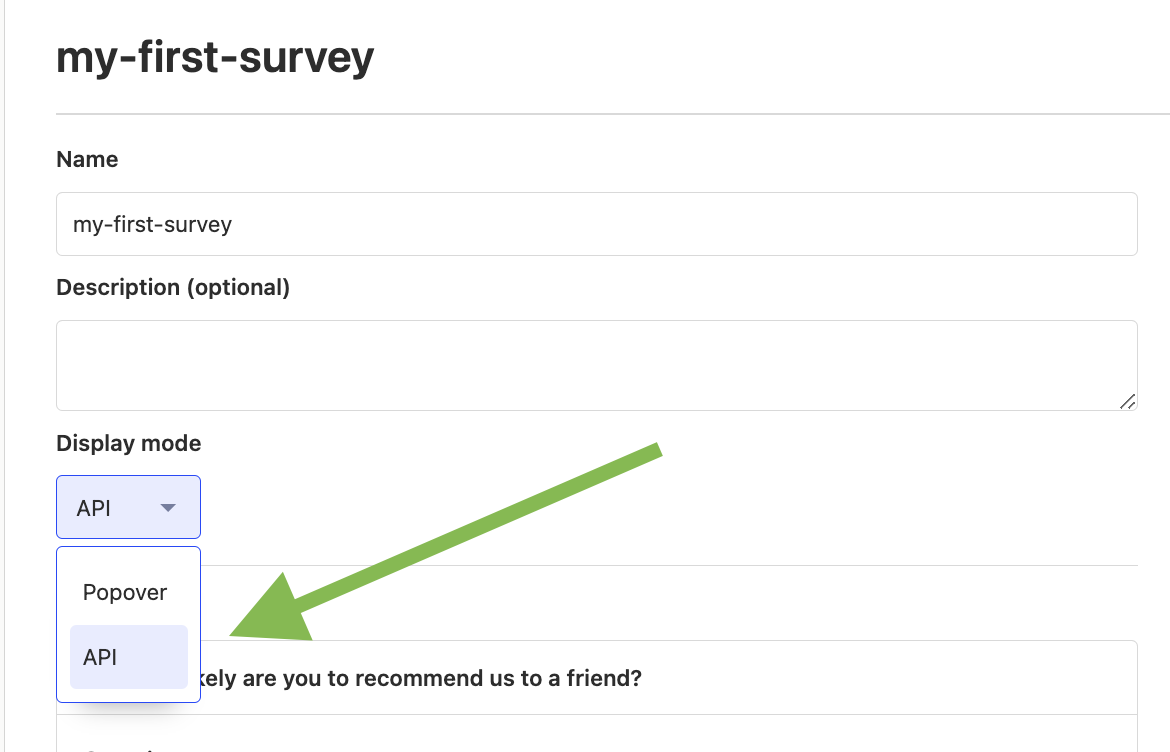
To create a survey with a prebuilt UI, go to the surveys tab
Add a name (like my-first-survey). Set the display mode to Popover. Select the Rating question type. Set the question title to How likely are you to recommend us to a friend?, display type to number and scale to 1-10. Leave the remaining optional properties blank (such as Display conditions or Thank you message). Click "Save as draft" and then on the next screen click "Launch".
That's it! Your survey is now live and you should see it in your app. After submitting responses, you can view results in PostHog
First, create a Rating survey in PostHog like in option 1 above, except set the display mode to API.
Then, there are four parts to adding code for our custom survey:
Create the survey UI. Fetch the survey from PostHog. Add the logic for displaying and hiding it. Capture interactions from it. We've created a sample survey UI for this tutorial. To use it, create a new file in app folder called Survey.js and paste the following code:
// app/Survey.js
import { useState } from 'react'
import styles from './page.module.css'
function Survey ( { title , onDismiss , onSubmit } ) {
const [ selectedValue , setSelectedValue ] = useState ( null ) ;
const handleSelect = ( value ) => {
setSelectedValue ( value ) ;
}
const handleSubmit = ( ) => {
onSubmit ( selectedValue ) ;
}
return (
< div className = { styles . survey } >
< h2 > { title } < / h2 >
< div >
{ [ ... Array ( 10 ) ] . map ( ( _ , i ) => (
< button className = { styles . button } key = { i + 1 } onClick = { ( ) => handleSelect ( i + 1 ) } > { i + 1 } < / button >
) ) }
< / div >
< div >
< button className = { styles . button } onClick = { onDismiss } > Dismiss < / button >
< button className = { styles . button } onClick = { handleSubmit } > Submit < / button >
< / div >
< / div >
) ;
}
export default Survey ;
Then, replace the CSS code in page.module.css with the following:
.main {
display : flex ;
flex-direction : column ;
justify-content : space-between ;
align-items : center ;
padding : 6 rem ;
min-height : 100 vh ;
}
.survey {
position : fixed ;
bottom : 20 px ;
right : 20 px ;
width : 400 px ;
padding : 20 px ;
background-color : #ffffff ;
box-shadow : 0 px 0 px 10 px rgba ( 0 , 0 , 0 , 0.2 ) ;
border-radius : 5 px ;
z-index : 1000 ;
}
.button {
margin : 5 px ;
padding : 5 px ;
}
Finally, integrate the component into page.js:
// app/page.js
'use client'
import { useState } from 'react'
import styles from './page.module.css'
import Survey from './Survey' ;
export default function Home ( ) {
const [ showSurvey , setShowSurvey ] = useState ( true ) ;
const handleDismiss = ( ) => {
setShowSurvey ( false ) ;
} ;
const handleSubmit = ( value ) => {
setShowSurvey ( false ) ;
} ;
return (
< main className = { styles . main } >
< div className = "App" >
< h1 > This is our Next . js survey tutorial < / h1 >
{ showSurvey && (
< Survey
title = { "Rate our service" }
onDismiss = { handleDismiss }
onSubmit = { handleSubmit }
/ > ) }
< / div >
< / main >
)
}
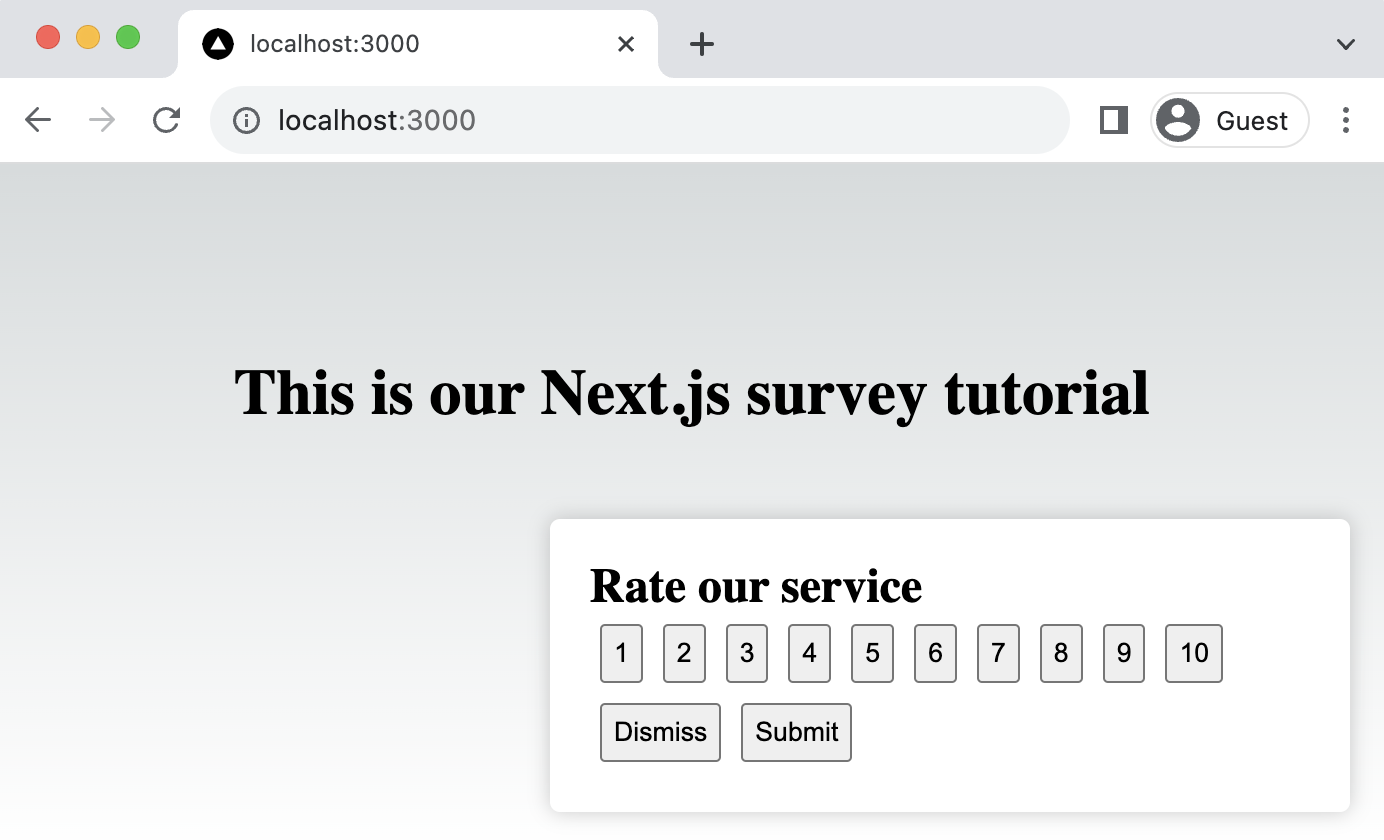
This shows a survey popup every time you visit your app's homepage.
PostHog keeps track of all active surveys for a user (this is especially helpful if you have set up custom display conditions
To fetch the active surveys, we use the usePostHog hook to call posthog.getActiveMatchingSurveys() using useEffect():
// app/page.js
'use client'
import { useState , useEffect } from 'react'
import styles from './page.module.css'
import Survey from './Survey' ;
import { usePostHog } from '@posthog/react' ;
export default function Home ( ) {
// ... rest of your code ...
const posthog = usePostHog ( )
useEffect ( ( ) => {
posthog . getActiveMatchingSurveys ( ( surveys ) => {
} ) ;
} , [ posthog ] ) ;
// ... rest of your code ...
}
posthog.getActiveMatchingSurveys() returns a surveys object that looks like this:
[
{
"id" : "018ad0e0-0de6-0000-6a56-033975bd0c68" ,
"name" : "my-first-survey" ,
"description" : "" ,
"type" : "api" ,
"questions" : [
{
"type" : "rating" ,
"scale" : 10 ,
"display" : "number" ,
"question" : "How likely are you to recommend us to a friend?" ,
"description" : "" ,
"lowerBoundLabel" : "Unlikely" ,
"upperBoundLabel" : "Very likely"
}
] ,
"conditions" : null ,
"appearance" : {
"textColor" : "black" ,
"whiteLabel" : false ,
"backgroundColor" : "white" ,
"submitButtonText" : "Submit" ,
"ratingButtonColor" : "#e0e2e8" ,
"submitButtonColor" : "#2c2c2c" ,
"descriptionTextColor" : "#4b4b52" ,
"thankYouMessageHeader" : "Thank you for your feedback!" ,
"displayThankYouMessage" : true
} ,
"start_date" : "2023-09-26T09:44:31.844000Z" ,
"end_date" : null
}
]
We can use this survey object to configure our Survey component:
// ... rest of your code ...
const [ surveyTitle , setSurveyTitle ] = useState ( false ) ;
const [ surveyID , setSurveyID ] = useState ( false ) ;
useEffect ( ( ) => {
posthog . getActiveMatchingSurveys ( ( surveys ) => {
if ( surveys . length > 0 ) {
const survey = surveys [ 0 ] ;
setSurveyID ( survey . id ) ;
setSurveyTitle ( survey . questions [ 0 ] . question )
}
} ) ;
} , [ posthog ] )
// ... rest of your code ...
return (
< main className = { styles . main } >
< div className = "App" >
< h1 > This is our Next . js survey tutorial < / h1 >
{ showSurvey && (
< Survey
title = { surveyTitle }
onDismiss = { handleDismiss }
onSubmit = { handleSubmit }
/ > ) }
< / div >
< / main >
)
We want to make sure we don't show the survey again to users who have either submitted or dismissed it. We use localStorage
// ... rest of your code ...
const [ showSurvey , setShowSurvey ] = useState ( false ) ;
useEffect ( ( ) => {
// Check local storage to see if the user has already seen this particular survey
const hasInteractedWithSurvey = localStorage . getItem ( ` hasInteractedWithSurvey_ ${ surveyID } ` ) ;
setShowSurvey ( ! hasInteractedWithSurvey ) ;
} , [ surveyID ] ) ;
const handleDismiss = ( ) => {
setShowSurvey ( false ) ;
localStorage . setItem ( ` hasInteractedWithSurvey_ ${ surveyID } ` , 'true' ) ;
} ;
const handleSubmit = ( value ) => {
setShowSurvey ( false ) ;
localStorage . setItem ( ` hasInteractedWithSurvey_ ${ surveyID } ` , 'true' ) ;
} ;
// ... rest of your code ...
The final step in setting up our survey is capturing interactions. This enables us to analyze the results in PostHog.
There are 3 events to capture:
"survey shown""survey dismissed""survey sent" (for responses)You can capture these events using posthog.capture():
// ... rest of your code ...
const handleDismiss = ( ) => {
setShowSurvey ( false ) ;
localStorage . setItem ( ` hasInteractedWithSurvey_ ${ surveyID } ` , 'true' ) ;
posthog . capture ( "survey dismissed" , {
$survey_id : surveyID // required
} )
} ;
const handleSubmit = ( value ) => {
setShowSurvey ( false ) ;
localStorage . setItem ( ` hasInteractedWithSurvey_ ${ surveyID } ` , 'true' ) ;
posthog . capture ( "survey sent" , {
$survey_id : surveyID , // required
$survey_response : value , // required
$survey_questions : [
{
id : "a3071551-d599-4eeb-9ffe-69e93dc647b6" ,
question : "How likely are you to recommend us to a friend?" ,
}
] // required for `getSurveyResponse` to work as expected
} )
} ;
useEffect ( ( ) => {
if ( posthog && surveyID && showSurvey ) {
posthog . capture ( "survey shown" , {
$survey_id : surveyID // required
} )
}
} , [ showSurvey , surveyID , posthog ] )
// ... rest of your code ...
Altogether, your code should look like this:
// app/page.js
'use client'
import { useState , useEffect } from 'react'
import styles from './page.module.css'
import Survey from './Survey' ;
import { usePostHog } from '@posthog/react' ;
export default function Home ( ) {
const [ showSurvey , setShowSurvey ] = useState ( false ) ;
const posthog = usePostHog ( )
const [ surveyTitle , setSurveyTitle ] = useState ( false ) ;
const [ surveyID , setSurveyID ] = useState ( false ) ;
useEffect ( ( ) => {
posthog . getActiveMatchingSurveys ( ( surveys ) => {
if ( surveys . length > 0 ) {
const survey = surveys [ 0 ] ;
setSurveyID ( survey . id ) ;
setSurveyTitle ( survey . questions [ 0 ] . question )
}
} ) ;
} , [ posthog ] )
useEffect ( ( ) => {
// Check local storage to see if the user has already seen this particular survey
const hasInteractedWithSurvey = localStorage . getItem ( ` hasInteractedWithSurvey_ ${ surveyID } ` ) ;
setShowSurvey ( ! hasInteractedWithSurvey ) ;
} , [ surveyID ] ) ;
const handleDismiss = ( ) => {
setShowSurvey ( false ) ;
localStorage . setItem ( ` hasInteractedWithSurvey_ ${ surveyID } ` , 'true' ) ;
posthog . capture ( "survey dismissed" , {
$survey_id : surveyID // required
} )
} ;
const handleSubmit = ( value ) => {
setShowSurvey ( false ) ;
localStorage . setItem ( ` hasInteractedWithSurvey_ ${ surveyID } ` , 'true' ) ;
posthog . capture ( "survey sent" , {
$survey_id : surveyID , // required
$survey_response : value , // required
$survey_questions : [
{
id : "a3071551-d599-4eeb-9ffe-69e93dc647b6" ,
question : "How likely are you to recommend us to a friend?" ,
}
] // required for `getSurveyResponse` to work as expected
} )
} ;
useEffect ( ( ) => {
if ( posthog && surveyID && showSurvey ) {
posthog . capture ( "survey shown" , {
$survey_id : surveyID // required
} )
}
} , [ showSurvey , surveyID , posthog ] )
return (
< main className = { styles . main } >
< div className = "App" >
< h1 > This is our Next . js survey tutorial < / h1 >
{ showSurvey && (
< Survey
title = { surveyTitle }
onDismiss = { handleDismiss }
onSubmit = { handleSubmit }
/ > ) }
< / div >
< / main >
)
}
Our survey is now ready to go! The next step is ship the changes, get responses, and view your results.
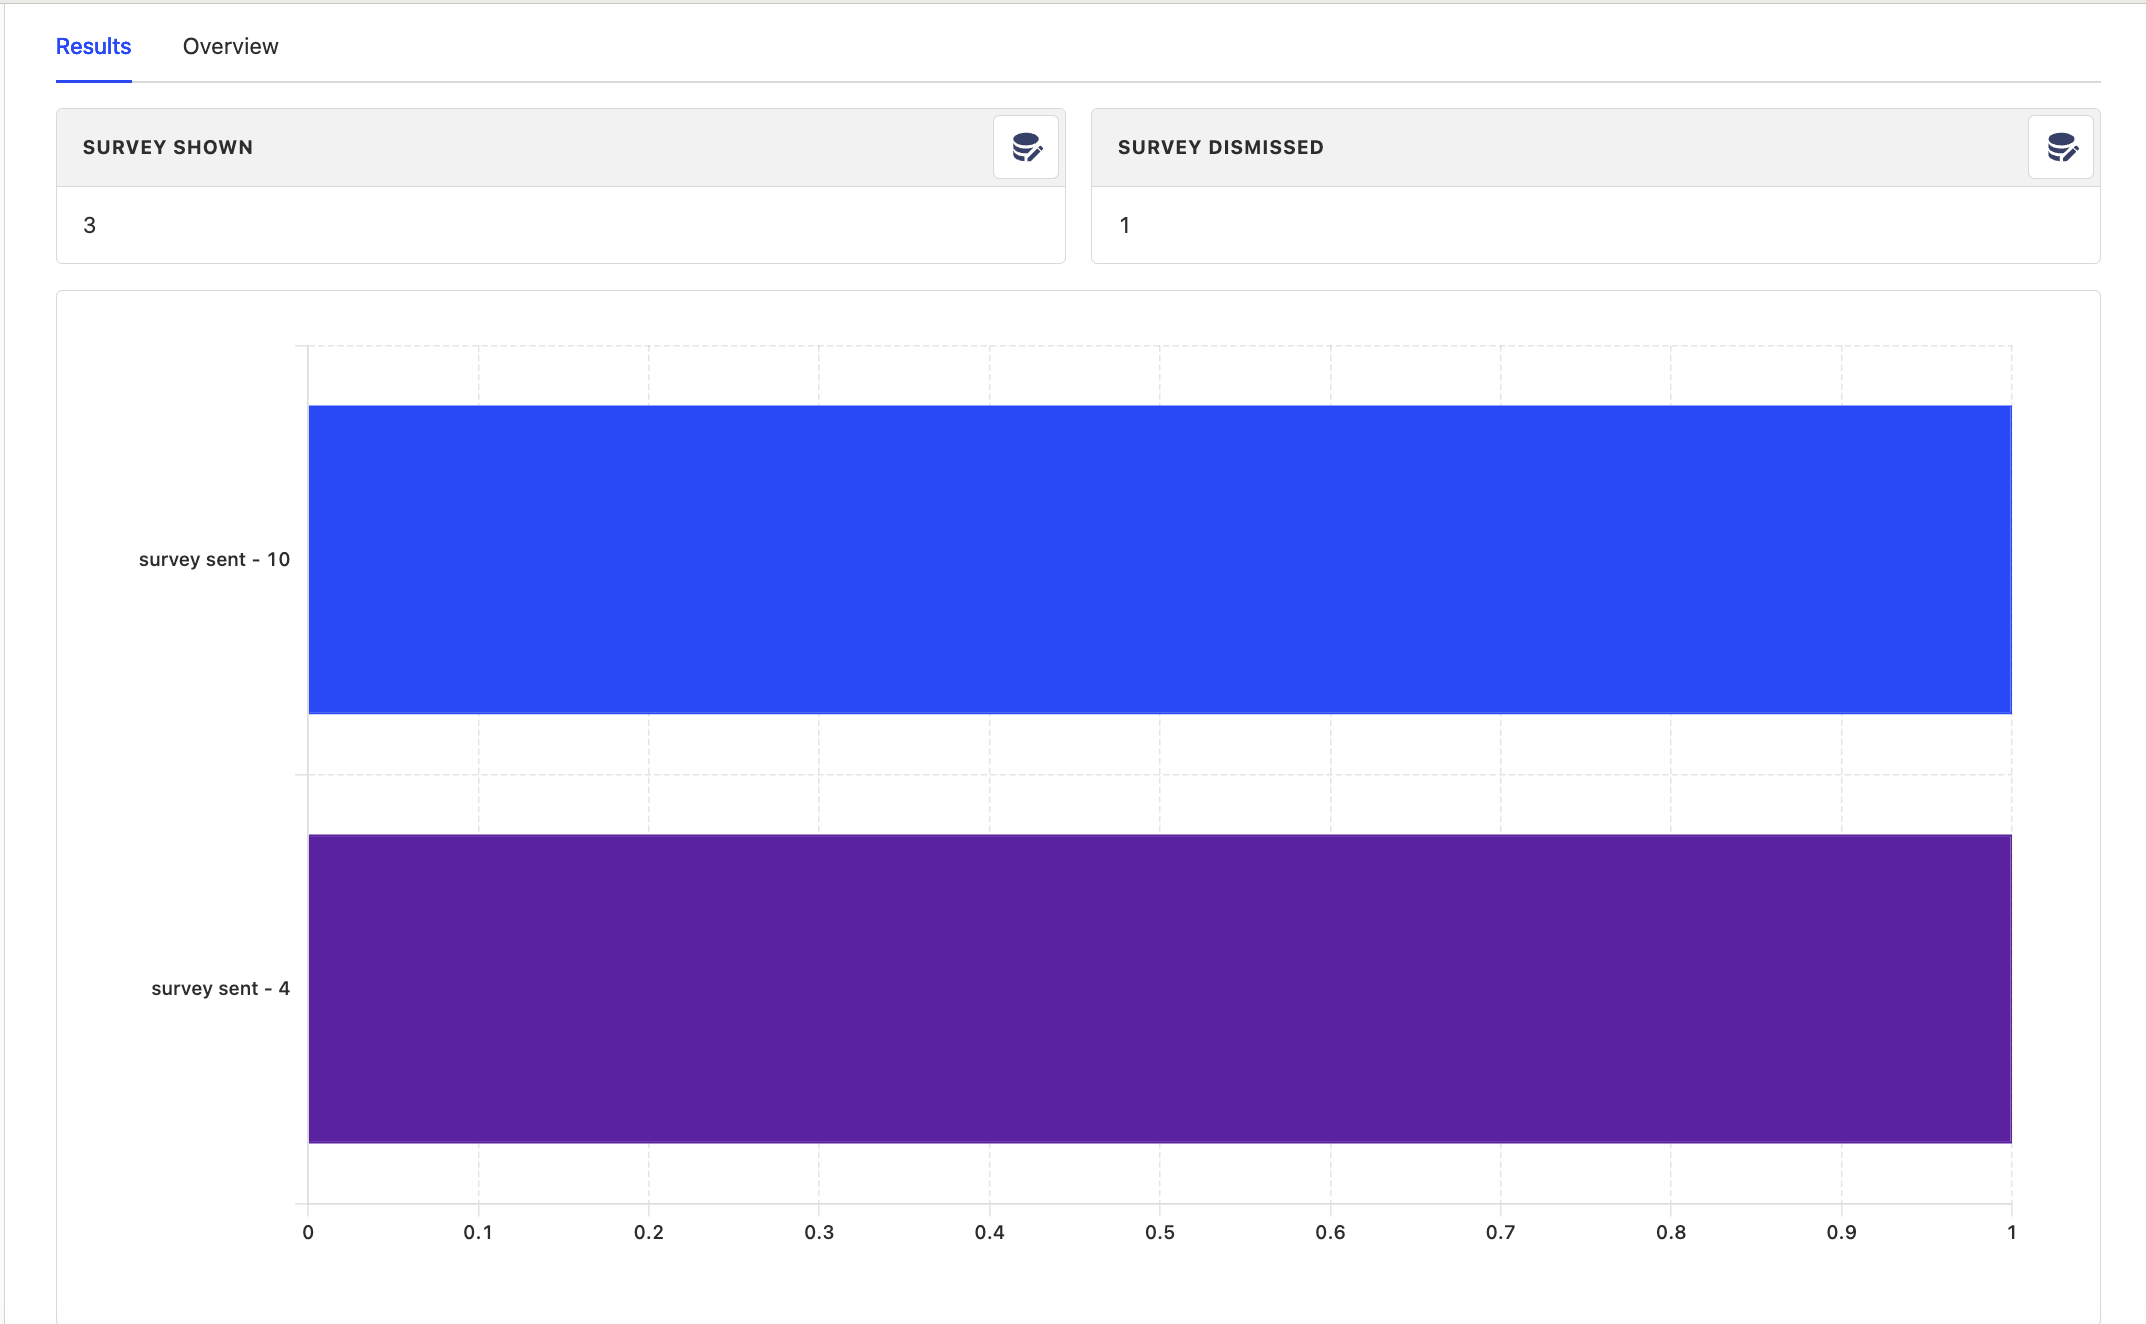
After interacting with your survey, you can view results by selecting the survey from the surveys tab
How many users have seen the survey. How many users have dismissed the survey. Responses. If you capture identified events, you can also filter these results based on person properties cohorts feature flags
Subscribe to our newsletter
Product for Engineers Read by 100,000+ founders and builders
We'll share your email with Substack