







Creating scanners
Contents
A scanner is made up of six things you author:
- A prompt describing what to look for.
- A scanner type that determines the output shape – see scanner types.
- Recording filters that select which sessions the scanner applies to.
- A session coverage mode that pre-filters by how much happens in a recording.
- A sampling rate that controls how many matching sessions get scanned.
- A model, which sets what each observation costs.
You can also give a scanner its own credit limit, so it can never spend more than that in a billing period.
Ways to start
Click New scanner on the Replay Vision page. Depending on your project, the first screen is either a grid of templates with a Set up with AI box below it, or a What should the scanner find out? page with a goal box, a monthly budget, and one-click starting points. Both offer the same three ways in: describe a goal, start from a common question, or Create from scratch.
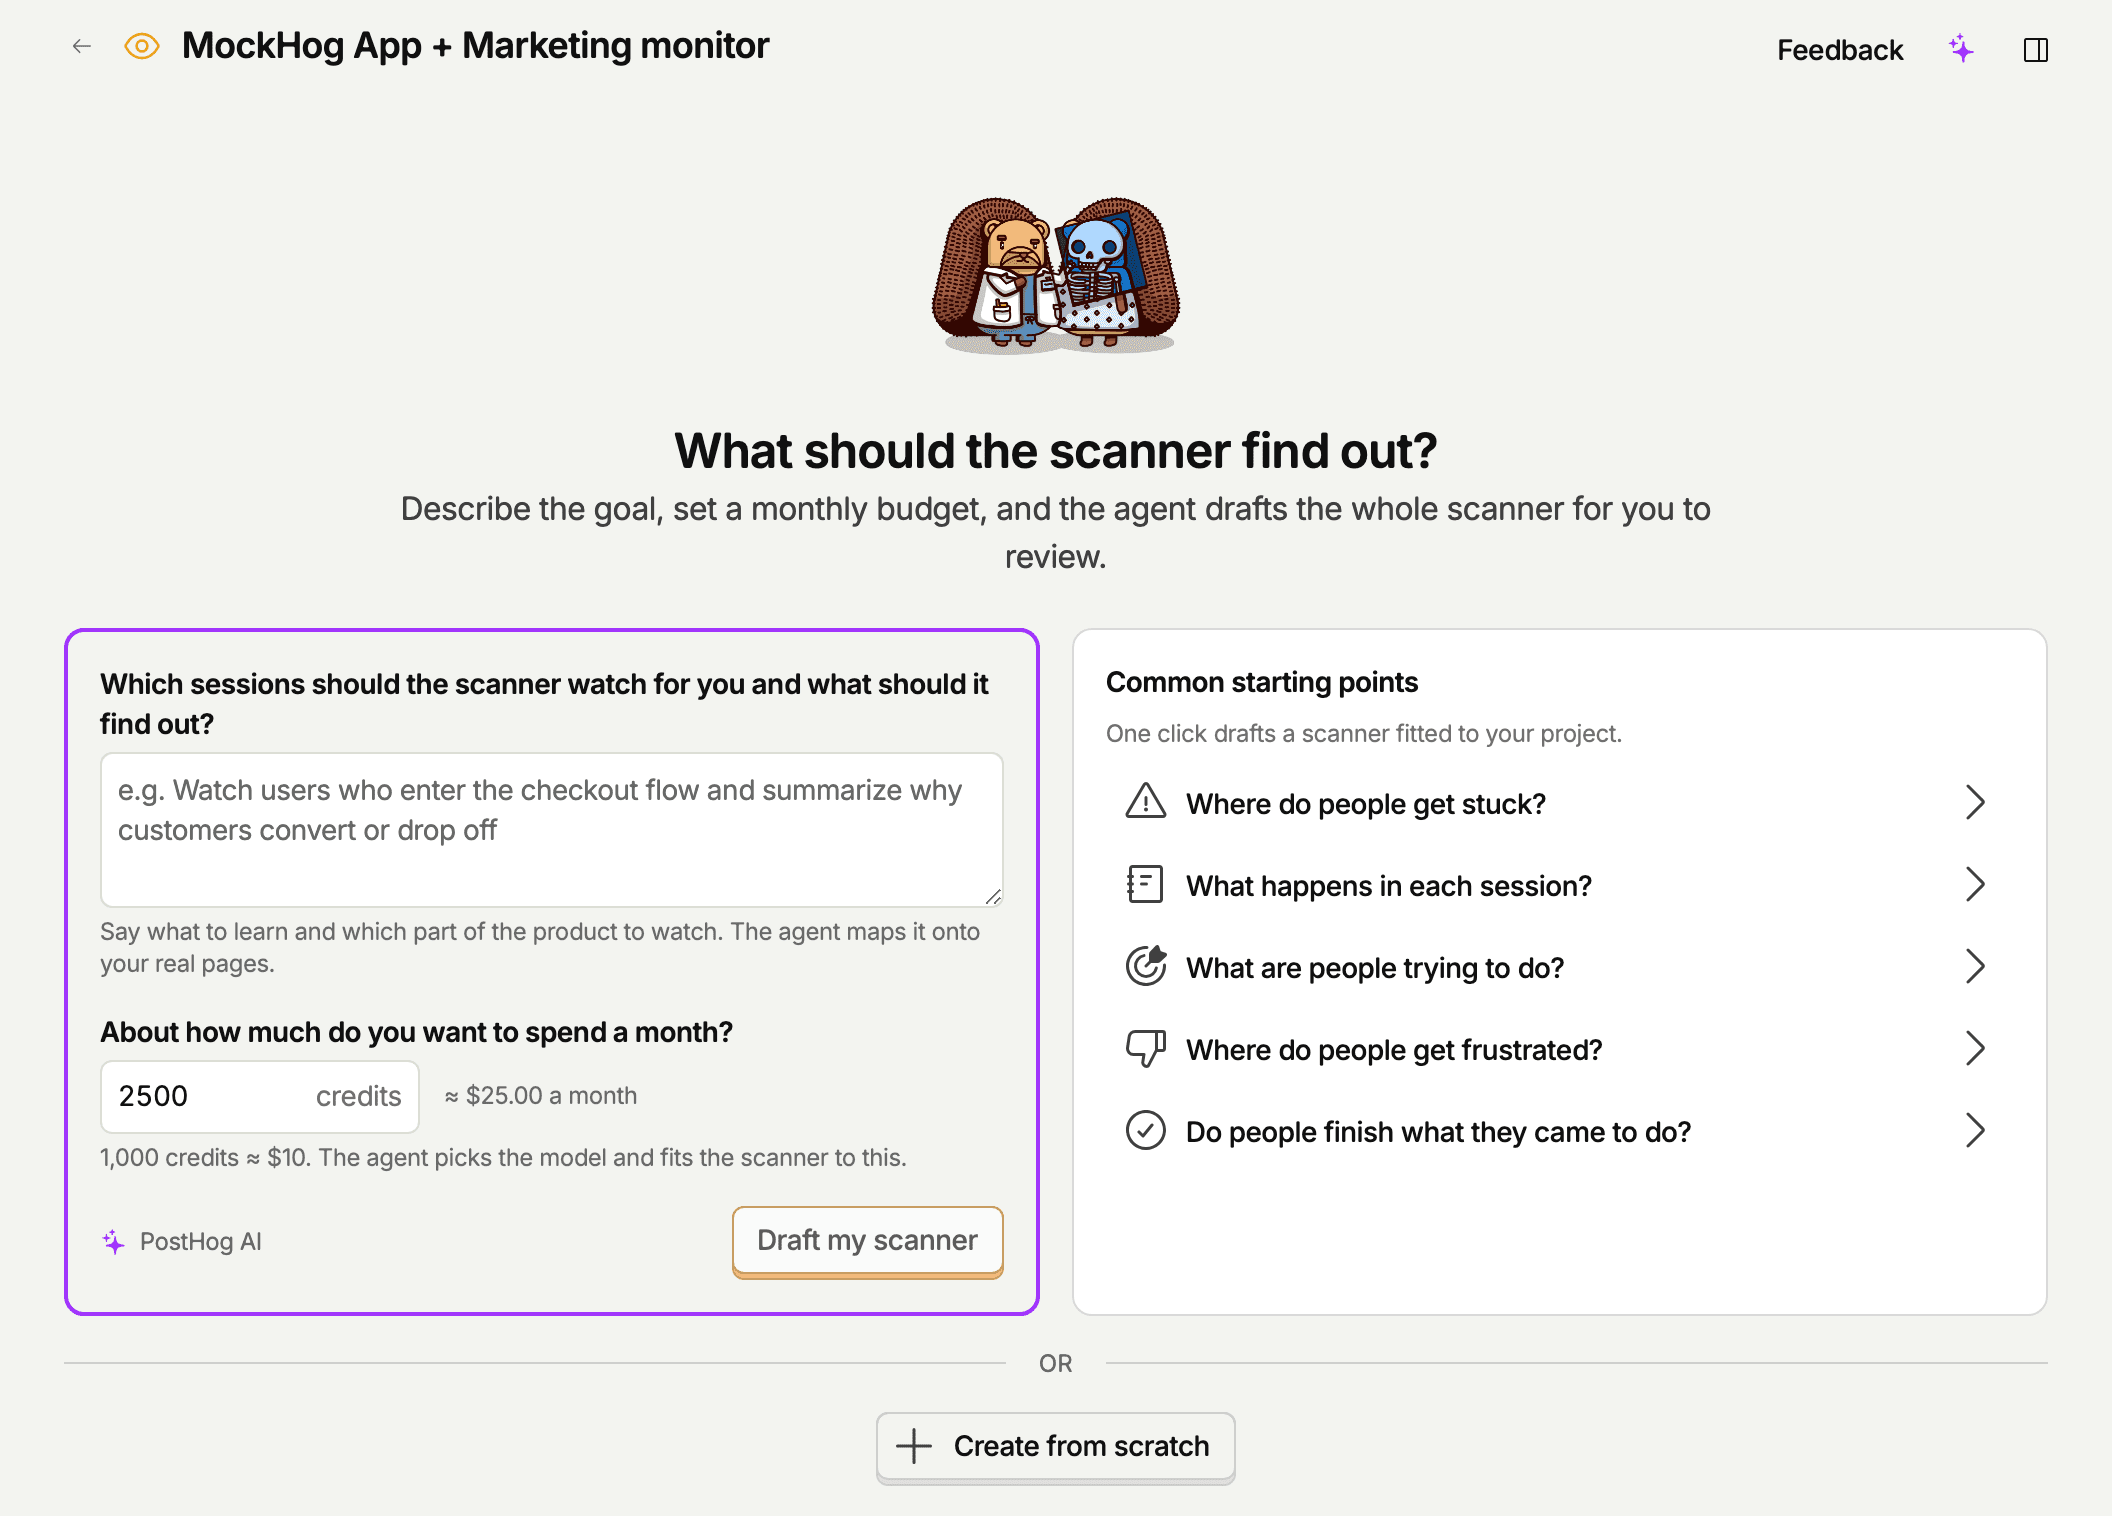
If your organization hasn't allowed AI data processing yet, an admin has to approve it before you can create a scanner. The New scanner button asks for that approval first.
Start from a common question
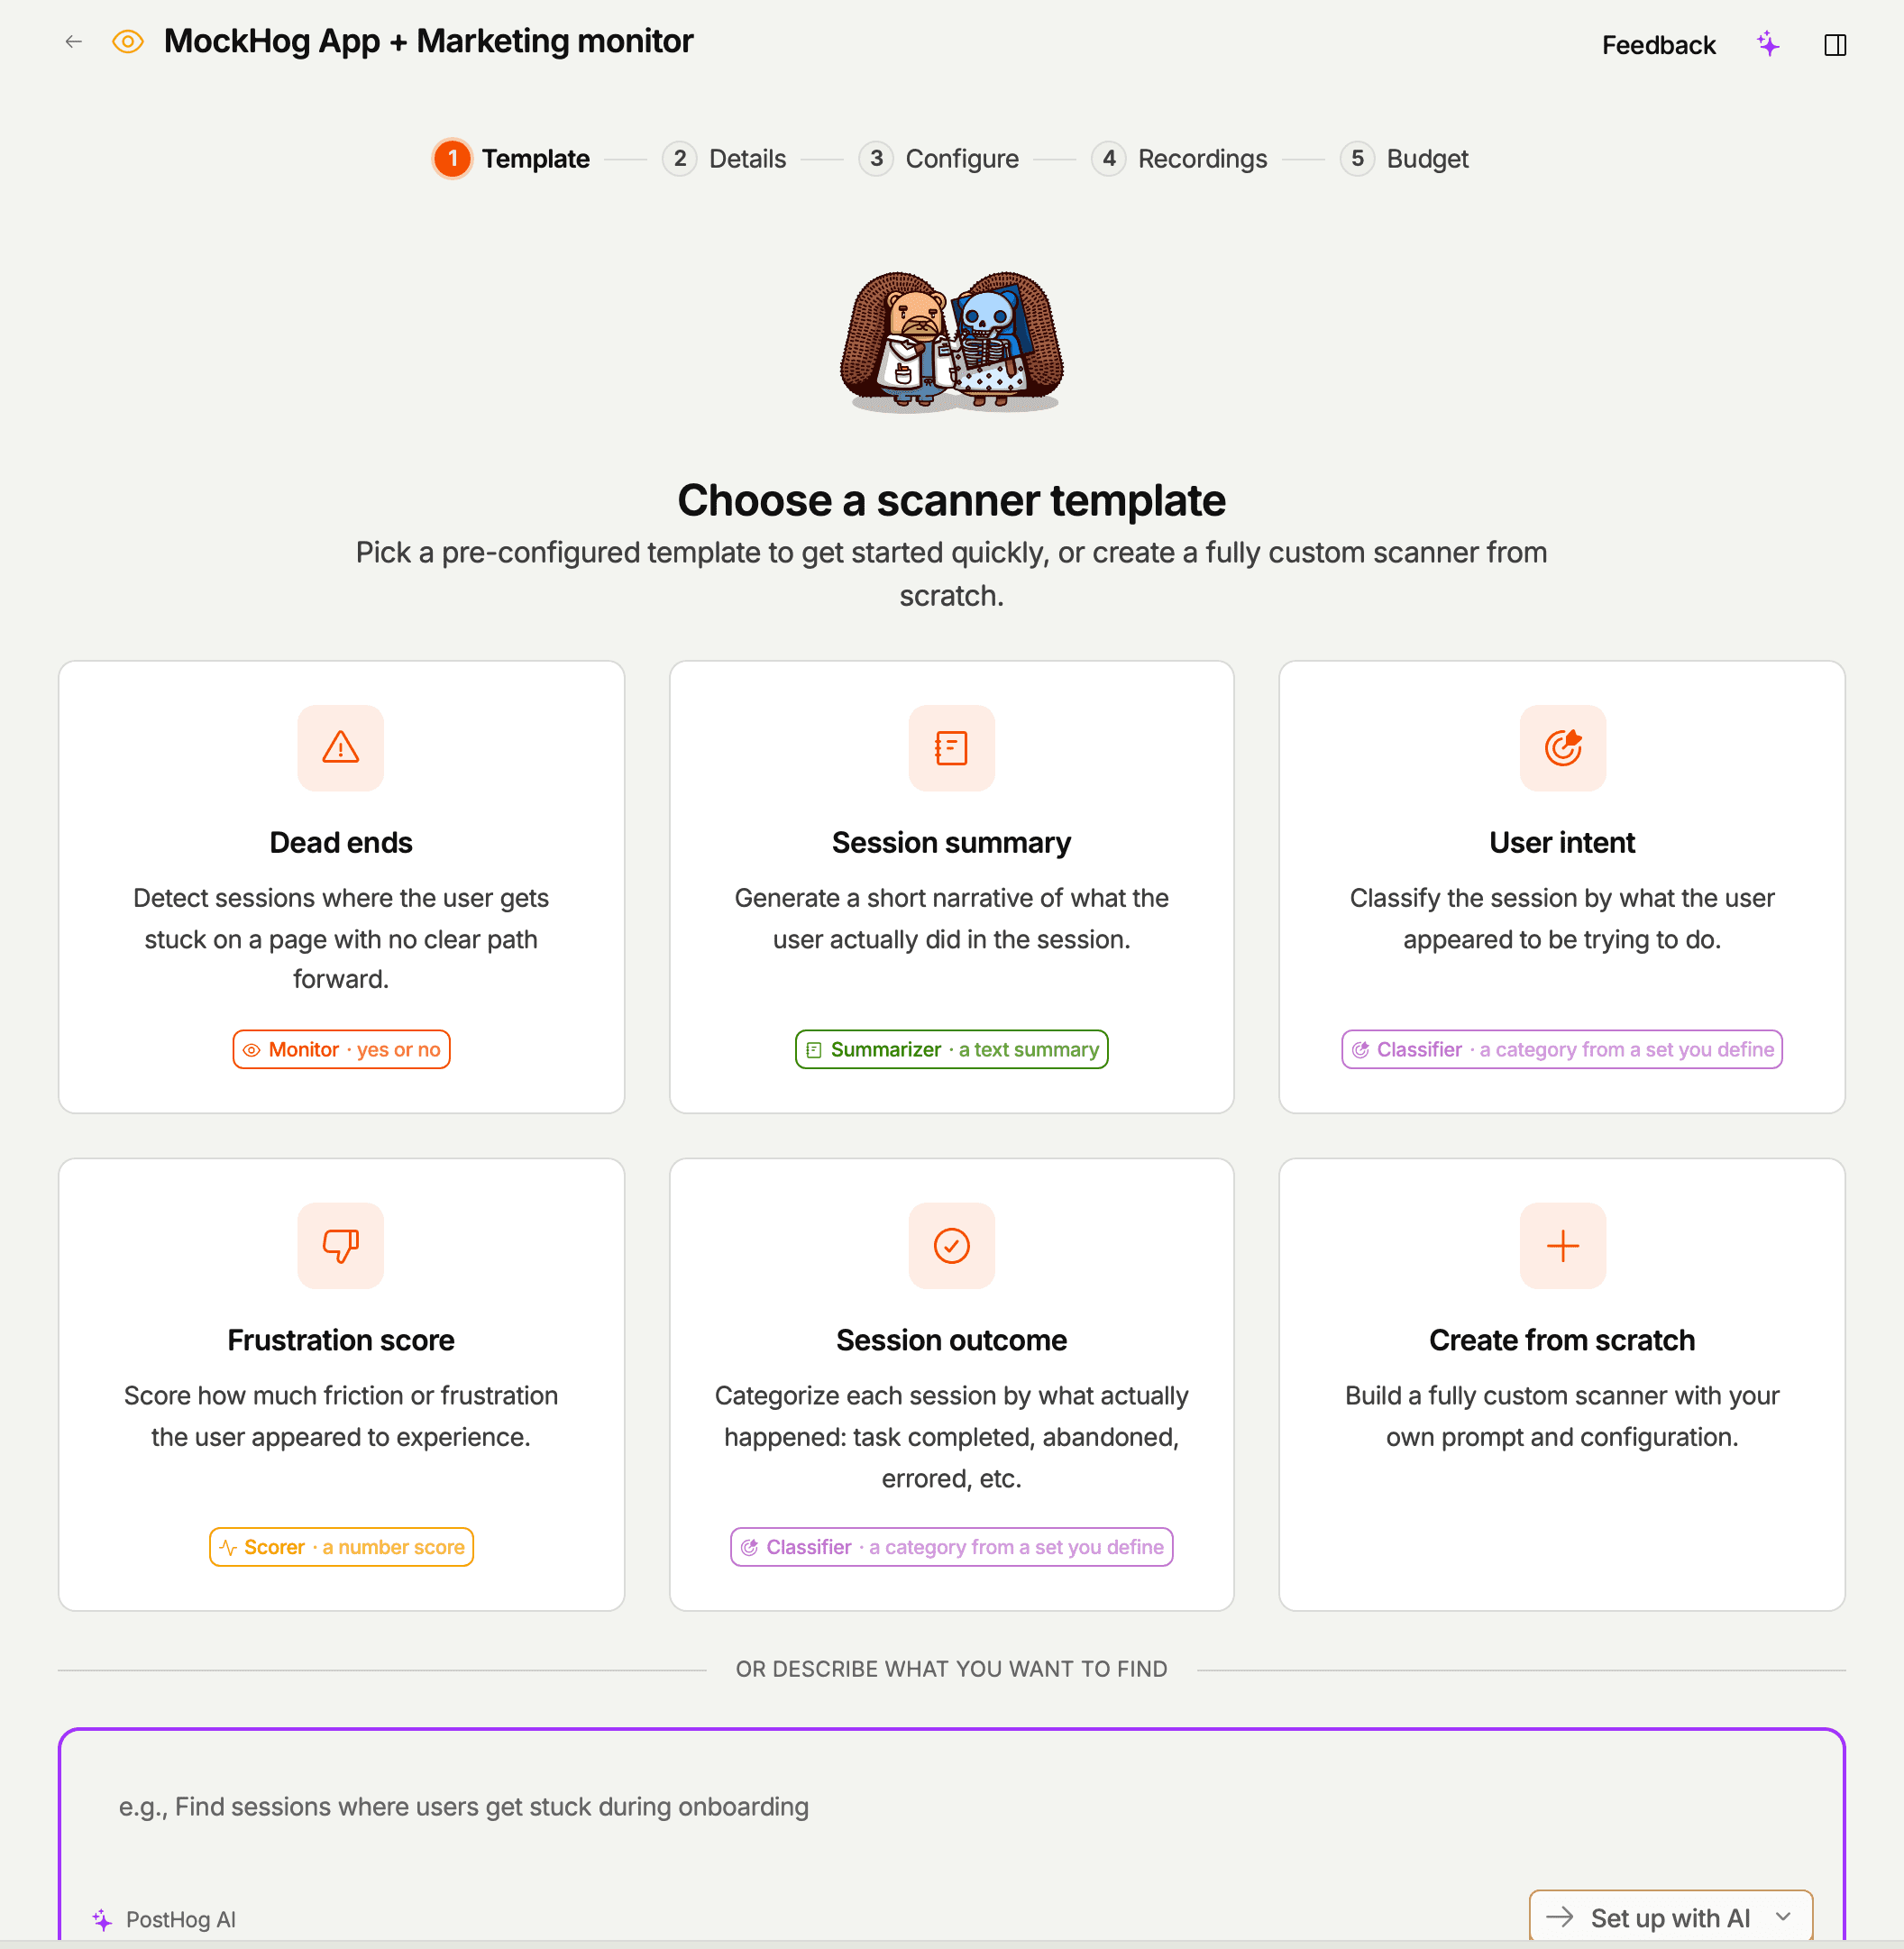
The five built-in templates cover the most common shapes and are worth starting from even when your real scanner ends up looking quite different:
| Template | Question | Type | What it does |
|---|---|---|---|
| Dead ends | Where do people get stuck? | Monitor | Flag sessions where the user appears stuck with no obvious next action |
| Session summary | What happens in each session? | Summarizer | Short narrative of what the user did |
| User intent | What are people trying to do? | Classifier | Tag each session with the likely intent (browsing, purchasing, support…) |
| Frustration score | Where do people get frustrated? | Scorer | Numeric score for how frustrated the user appeared |
| Session outcome | Do people finish what they came to do? | Classifier | Tag what happened: task completed, abandoned, errored, etc. |
On the template grid, picking a template pre-fills the editor with its name, type, and prompt, a 20% sampling rate, session coverage that skips the least active recordings, and no recording filters. The type is fixed by the template you picked; to use a different type, start from another template or from scratch. A classifier template's categories are examples, so edit them to fit your product.
On the goal page, the same starting points appear as questions. Clicking one has PostHog AI draft a scanner from that question for your project, the same way it drafts from a typed goal.
Describe a goal
Type what you want to find out, for example "watch users who enter the checkout flow and summarize why they convert or drop off". PostHog AI reads your goal alongside your product's real pages, events, and existing scanners, then drafts the type, name, prompt, type-specific settings, and recording filters. Filters only use pages, events, and other definitions that exist in your project, so the draft doesn't invent an event name that matches nothing.
When the page asks for a monthly budget in credits (1,000 credits is about $10), the draft also:
- Picks the model by how much judgment the goal needs.
- Chooses a session coverage mode and the highest sampling rate the budget covers, based on recent recording volume.
- Sets the scanner's credit limit to your budget, so a wrong estimate can't overspend it.
- Can scope the scanner to an action, a cohort, a survey, or an experiment's participants when your goal names one.
Nothing is saved until you review the draft and click Create scanner. A budget-based draft opens on an overview: what PostHog AI understood, the name, the question the scanner asks, the eligible recordings with a count from recent days, and the sampling budget. Each section has an Edit button that opens the matching editor step. A draft from the Set up with AI box opens in the editor steps instead, with a note on why PostHog AI chose that setup.
Create from scratch
Create from scratch opens the editor on a blank monitor. Pick the type on the Configure step. Once you save, the type is fixed.
Let the wizard write them
Templates are generic by design. If you'd rather start from scanners that already know your product, run the wizard in your project directory:
It reads your codebase and creates three scanners: a breakage monitor scoped to the URLs of your key flow, a frustration monitor gated on rage clicks, and a low-sampled summarizer that uses your product's own vocabulary. The prompts name the things that actually break in your app rather than generic web copy.
These are ordinary scanners, so everything below still applies. Edit the prompt, retune the filters, or delete them.
The editor steps
Whichever way you start, the scanner editor has four steps. A budget-based draft shows the same settings on its overview instead, with an Edit button for each.
- Details – a name, a description, and tags. All three are optional, and the scanning model doesn't see the description or tags.
- Configure – the scanner type, the model, the prompt, the type's own options, and the self-driving toggle.
- Recordings – the recording filters.
- Budget – the sampling rate, session coverage, an optional credit limit, and the estimated cost.
Editing a saved scanner uses the same steps. The type can't be changed after the scanner is created.
Writing the prompt
This is the single most important thing you'll do. A good prompt is concrete, narrow, and tells the model what to do when it's unsure. For complete worked examples, see scanner prompts.
Be concrete, not speculative
The model is good at describing what it sees. It's much less good at guessing intent or emotion from sparse evidence. Anchor the prompt in observable behavior.
✅ "Answer yes if the user scrolls a page for more than 10 seconds without clicking anything and then leaves."
❌ "Answer yes if the user feels confused."
Confusion isn't observable; rage clicks, repeated retries, and dead-end navigation are. Spell those out.
Tell it how to handle uncertainty
When the model is handed an ambiguous session, its default is to make something up. Preempt that by writing the uncertain branch into the prompt.
✅ "If there isn't enough evidence to tell, answer no."
✅ "If the session is too short to judge, tag it unclear."
Cite specific moments in reasoning
Ask for citations in the reasoning, so the result is auditable. The model is already prompted to do this, but it helps to remind it when results are vague.
✅ "Explain your verdict and cite the specific moments in the recording that drove it."
Ask for personal data only when you need it
PostHog checks every answer for personal data, such as names, email addresses, or phone numbers, that the prompt didn't ask for. An answer that still contains it after one rewrite fails with Personal data in answer, and PostHog doesn't save it. Write prompts that describe what users do, not who they are. If your scanner really needs to identify the person, say so in the prompt.
Tune iteratively against real recordings
A prompt that reads beautifully on its own can still misfire. The fastest feedback loop:
- Author the scanner.
- Run it on-demand against 5–10 recordings you already understand.
- Open the observations and read the reasoning + citations.
- Adjust the prompt where the model misread something obvious.
- Scan another batch of recordings and repeat until the results look right.
A new scanner is enabled when you create it, and its first sweep starts within minutes. If you want to tune before the automatic sweep spends credits, turn the scanner off in the Scanners list right after creating it. On-demand scans still work while it's off, and a poorly tuned scanner can burn through your budget fast on results you'd throw away anyway.
As you read observations, answer Did the scanner get this right? with a thumbs up or down, and add a note on what it got right or wrong. PostHog turns your team's ratings into guidance the scanner applies on later scans, so rating a handful of observations improves results without editing the prompt. See improving scanners with ratings. To change the prompt itself, edit the scanner. Editing creates a new scanner version, and past observations keep the prompt that produced them.
Drafting prompts with PostHog AI
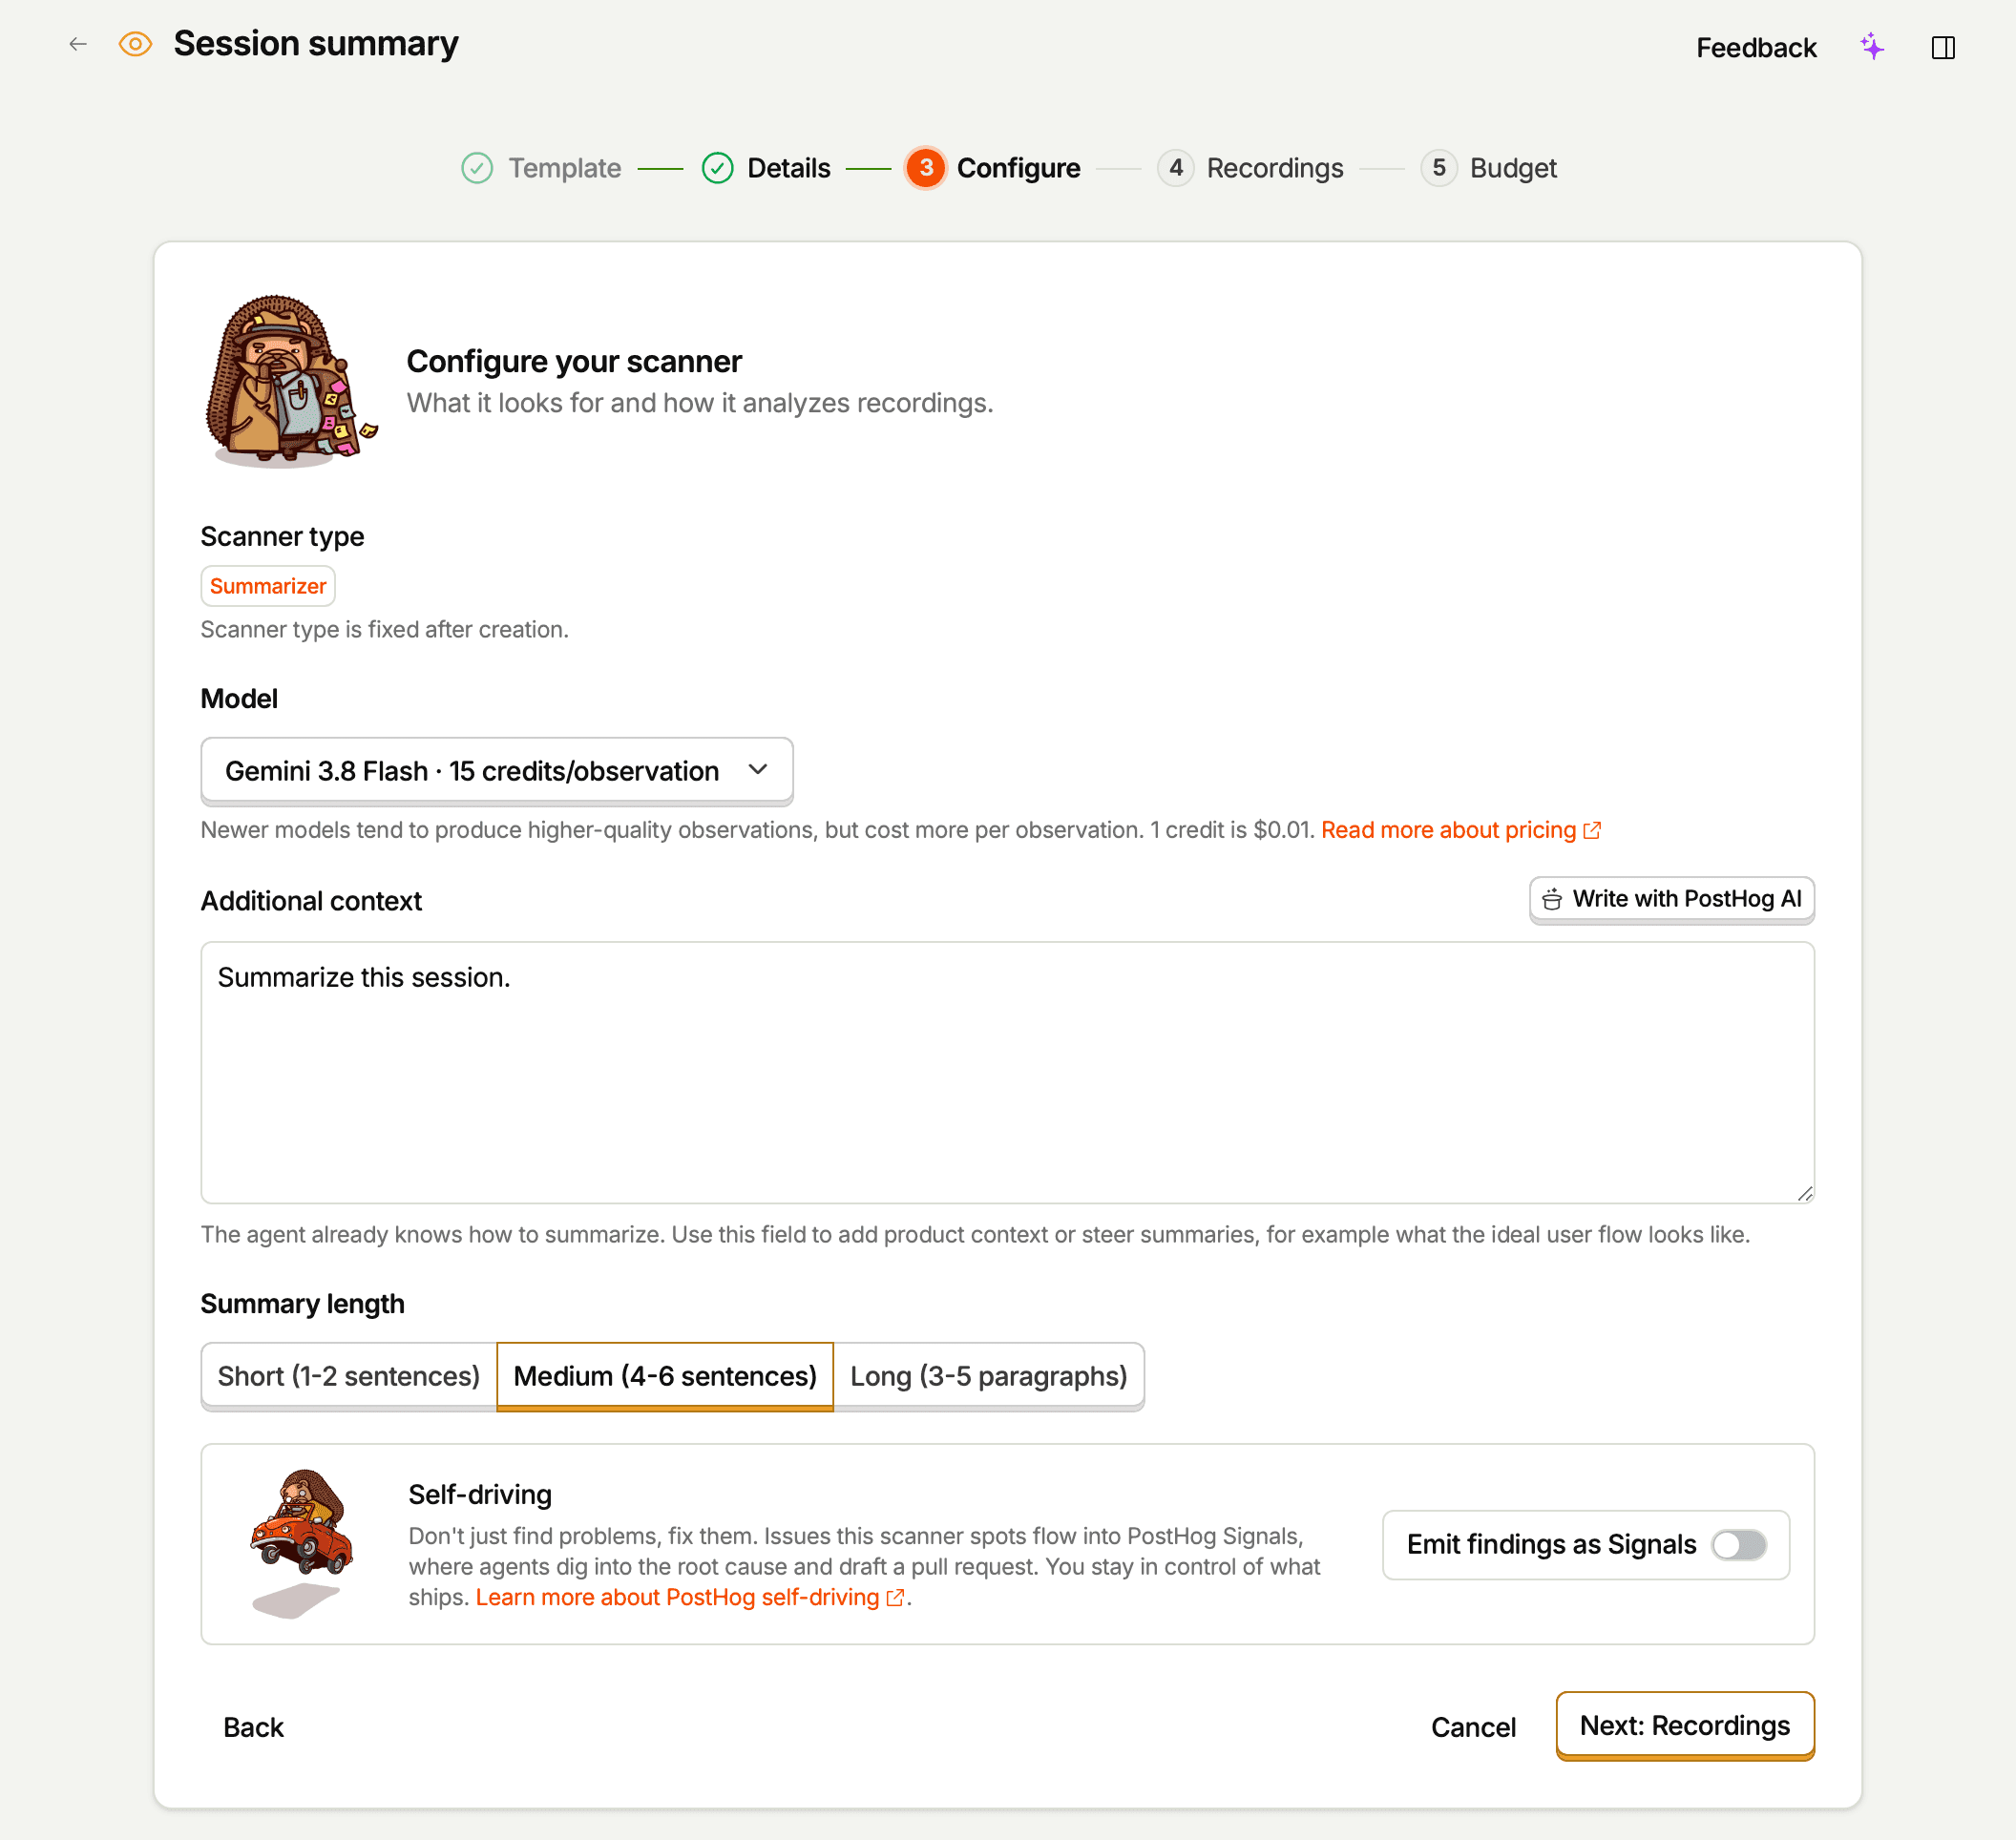
On the Configure step, Write with PostHog AI next to the prompt field opens PostHog AI with your scanner's type and current prompt. Describe what you want in natural language, and it drafts a prompt and fills it into the form for you to edit. On a scanner PostHog AI already drafted, the button reads Rewrite with PostHog AI. The button doesn't appear on every setup path for a new scanner, but it's always there when you edit a saved one.
A prompt usually needs a few rounds before it returns what you want. Post yours in the PostHog Discord to get a second opinion, and to see the prompts other teams run.
Type-specific configuration
Each scanner type has a few extra knobs. The full reference is on the scanner types page; the highlights:
- Classifier – define your Categories (or click Suggest categories with PostHog AI for suggestions grounded in your prompt, your product, and what's been seen in recordings), choose whether multiple categories per session are allowed, and whether the model can invent categories outside your list.
- Scorer – set the numeric scale (min, max) and an optional one-word score label.
- Summarizer – pick a summary length (short / medium / long). The core summarizer prompt is built in, so the prompt field becomes Additional context: use it for product context or steering, like what the ideal user flow looks like.
- Monitor – turn on Allow inconclusive verdicts to let the model answer
inconclusiverather than forcing a yes/no answer.
The editor also has a model picker, which sets the price of every observation the scanner makes: 2 credits on Gemini 3.5 Flash Lite, 5 on Gemini 3 Flash (the default), and 15 on Gemini 3.8 Flash. Newer models tend to produce higher-quality observations, but the top tier costs over seven times as much per session as the cheapest. Start on the default. If results are close but not quite right, tune the prompt before reaching for a pricier model, since a sharper prompt is free and rating a few new observations will tell you whether it worked. See quota and limits for how credits are metered.
Filters: scoping the scanner

The Recordings step uses the same filter builder as the Session Replay recordings list. You can filter by:
- Events and actions the session contains, and event properties
- Person properties (e.g. plan tier, signup date)
- Session properties (e.g. page count, country)
- Group properties (e.g. company name, account tier) – requires group analytics
- Cohorts
- Feature flags
- Recording duration
Choose whether a session has to match all of your filters or any of them, and turn on Filter out internal and test users to apply your project's internal and test account filters.
A scanner with no filters matches every eligible session in your project, and the editor warns you about this. It also warns you when no recordings from recent days match your filters, because the scanner would have nothing to scan. A scanner with narrow filters – e.g. "sessions on /checkout longer than 30 seconds for users on the trial plan" – is much cheaper, much faster to iterate on, and usually more useful.
One limit applies regardless of filters: recordings with more than 1 hour of active interaction take too long to analyze well, so Vision always skips them.
If you set the scanner up from an experiment (Set up scanner for this experiment on the experiment's replay tab), it watches only sessions of people exposed to that experiment. An Experiment targeting card on the Recordings step names the experiment, lets you narrow it to one variant, and has a Remove targeting button. Filters you add yourself still apply on top.
A good default discipline: start with a narrow filter while you're tuning the prompt, then widen the filter once you trust the results.
Session coverage: filtering by activity
The Session coverage setting on the Budget step pre-filters recordings by their activity level before sampling is applied. It uses an activity score that estimates how much happens in a recording – interactions, errors, navigation – versus idle or empty sessions.
| Mode | What it keeps |
|---|---|
| High activity recordings only | Roughly the top 25% of sessions by activity score |
| Medium and high activity recordings | Roughly the top 65% of sessions by activity score |
| All recordings | Every session matching your filters |
A scanner you set up in the editor starts on Medium and high activity recordings. Sessions that don't have an activity score yet are treated as average and kept by every mode.
Keep All recordings when your scanner looks for quiet behavior, such as people giving up or drifting away. Those sessions look uneventful, so a tighter mode would skip the very sessions the scanner is looking for.
The three-step filtering process is:
- Recording filters pick sessions matching your criteria.
- Session coverage drops low-activity sessions by activity score.
- Sampling rate randomly keeps a fraction of what's left.
Use a tighter coverage mode when you want to spend your budget on sessions where something actually happened, rather than idle or empty recordings.
Sampling rate: controlling volume
The sampling rate (0.1–100%) is applied after the filters and session coverage. A scanner with filter "sessions over 30 seconds" and sampling 25% scans roughly one in four of those sessions.
The Budget step shows an Estimated cost – the credits the scanner is projected to spend per month at the selected model's price, next to what you've spent this billing period, what your other scanners and backfills are projected to spend, and your spend limit. It's based on your project's recent recording volume, the filters you've set, the session coverage mode, the sampling rate, and the model. Use this to size the scanner against your budget before saving.
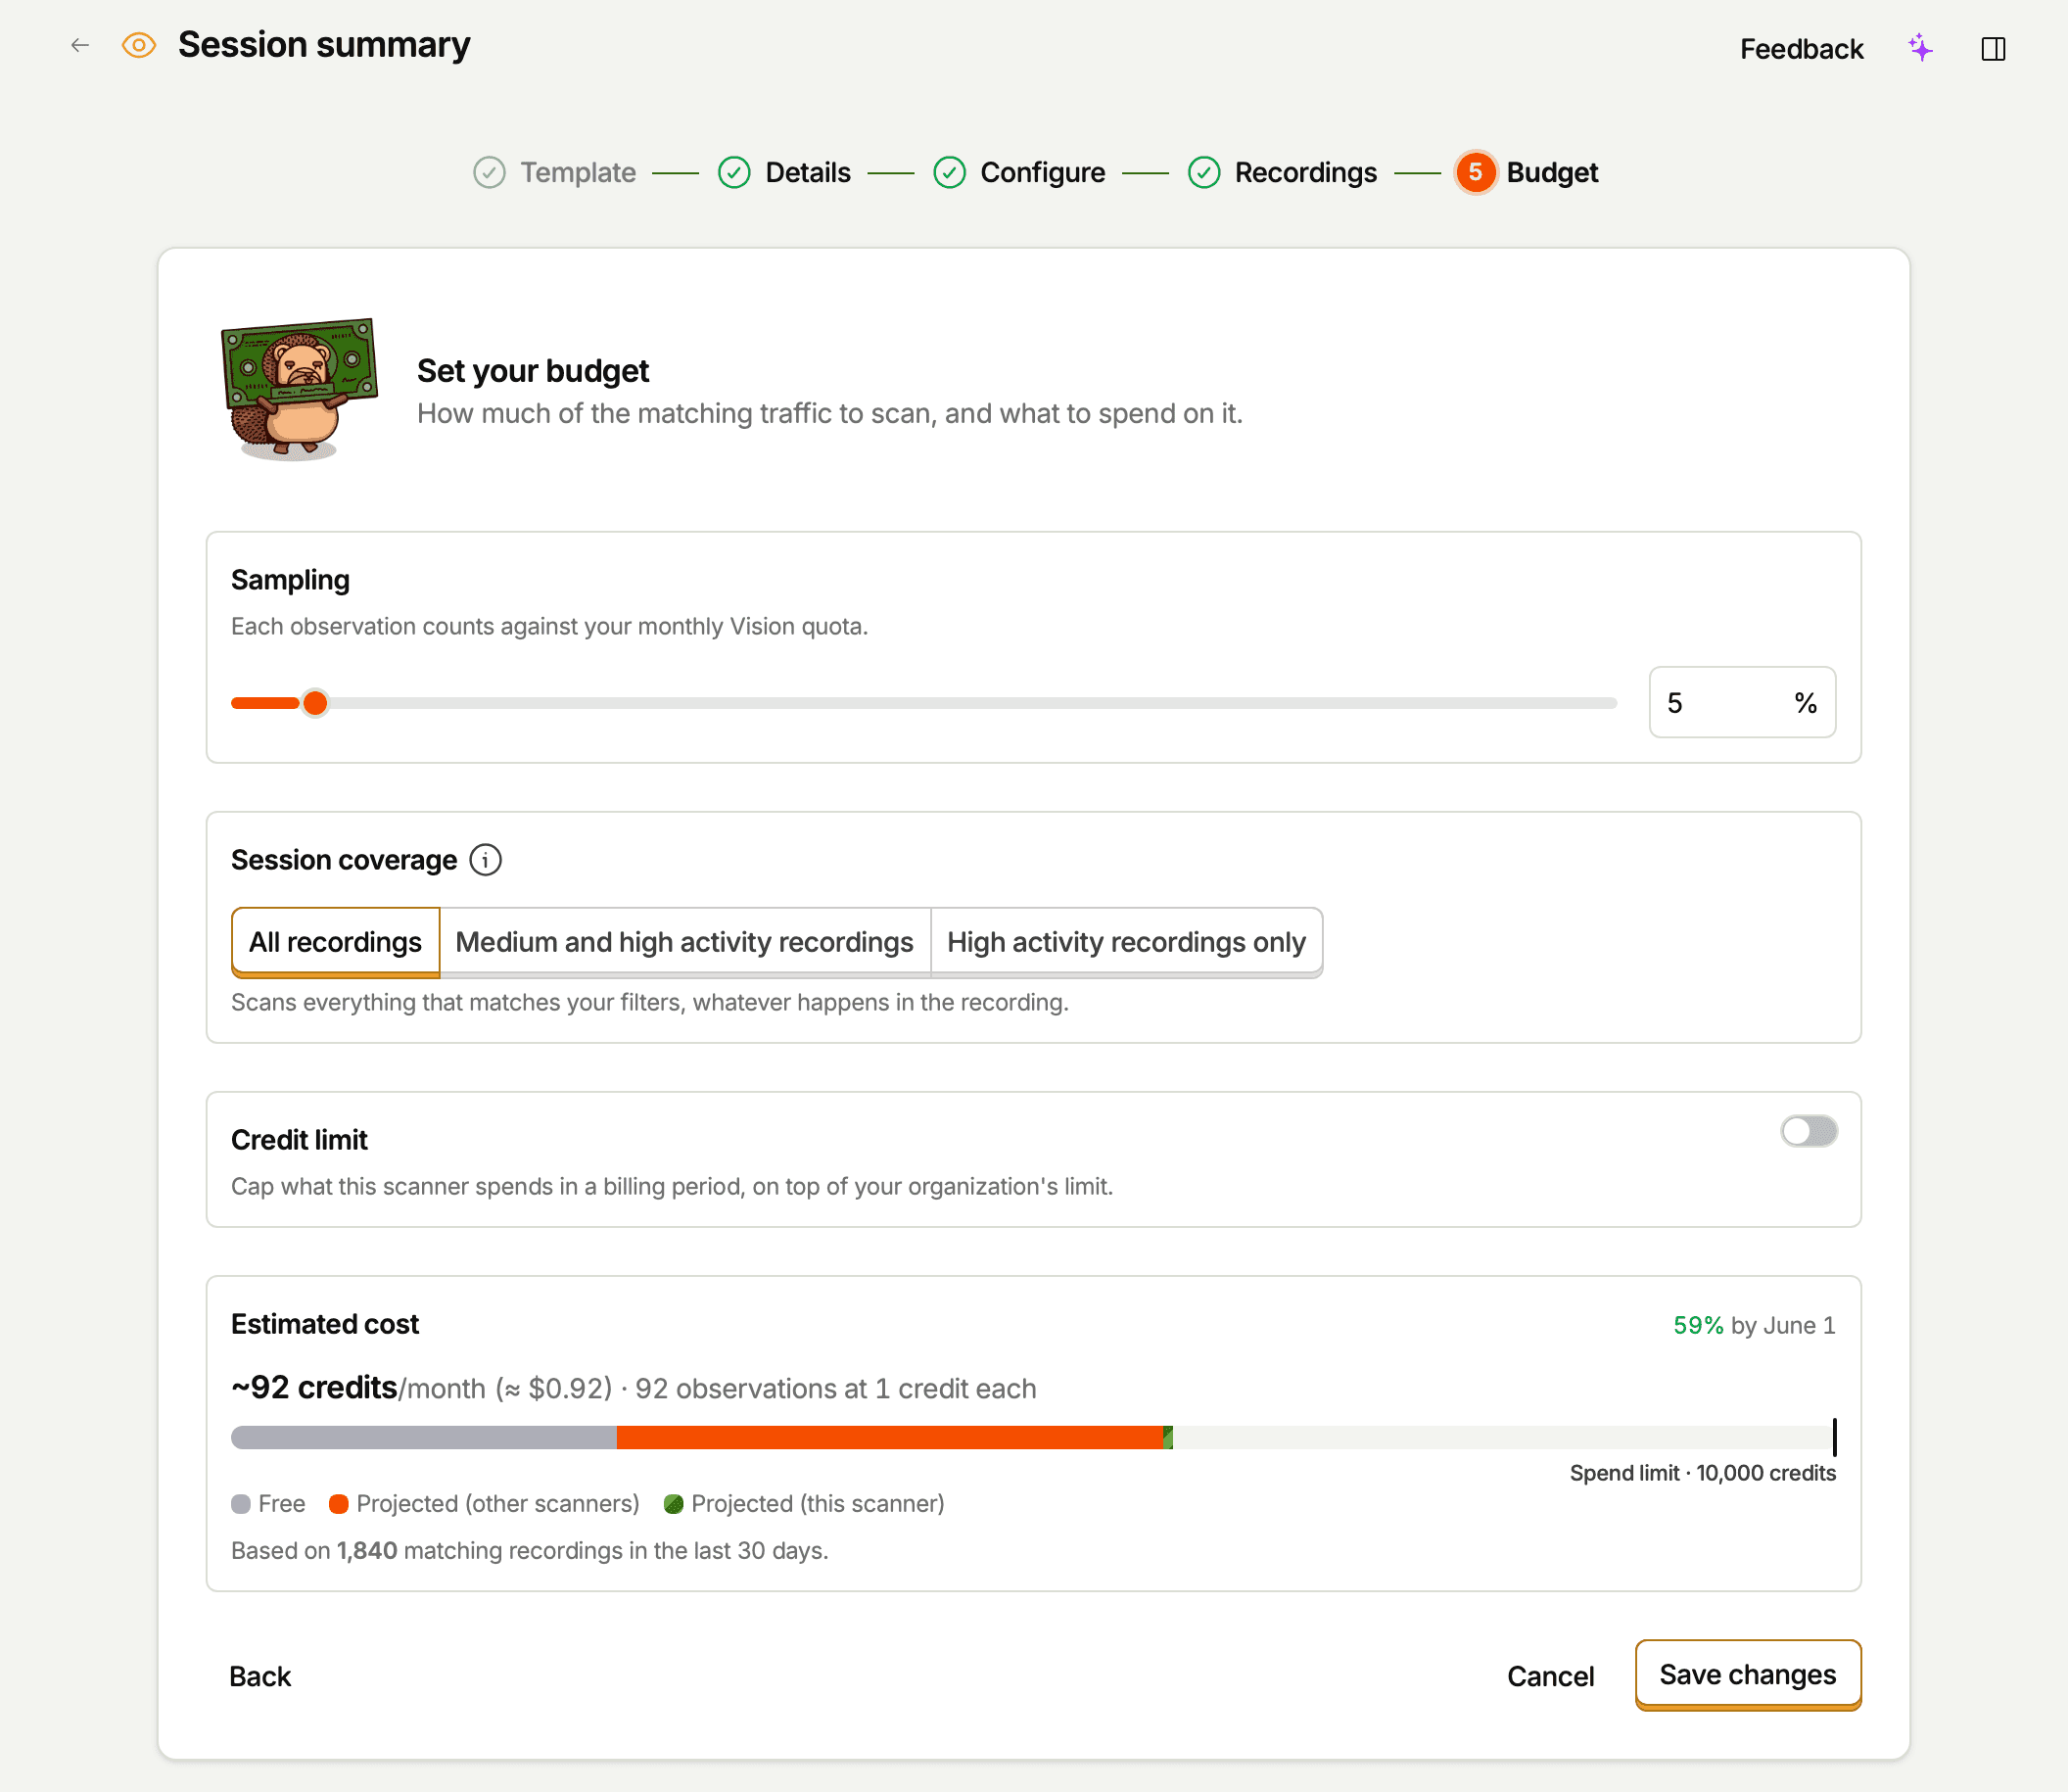
If the estimate looks too high, you have four knobs:
- Narrow the filters.
- Tighten the session coverage mode (All recordings → Medium and high activity recordings → High activity recordings only).
- Lower the sampling rate.
- Pick a cheaper model.
Credit limit: capping one scanner
Turn on Credit limit on the Budget step to cap what this scanner can spend in a billing period, on top of your organization's limit. When the scanner reaches its limit, it stops scanning until the next billing period. It stays enabled, but the sessions it skipped aren't scanned later, even if you raise the limit. The editor warns you when the limit is below the scanner's estimated monthly cost, or too low to pay for a single scan.
Enabling and disabling
Scanners are enabled by default when you save. A new scanner's first sweep scans a few matching recordings from the last 24 hours, so you see results quickly. After that, an enabled scanner sweeps for new matching sessions every few minutes. It doesn't go back through older recordings on its own – use Backfill a date range on the scanner's Run tab for that. See running scanners.
Turn a scanner on or off with its switch in the Scanners list or on the Usage tab. Disabling stops the background sweep. On-demand triggers (from the player, the scanner's Run tab, or via MCP) still work on a disabled scanner – disabling only affects the automatic schedule.
To stop a scanner entirely, delete it. Deleting a scanner also removes all of its observations from the Observations tab. The $recording_observed events the scanner produced are ordinary PostHog events in your project's event stream and aren't affected – they stay queryable.
Handing off to Responder agents
Each scanner has an Emit findings as Signals toggle on the Self-driving card of the editor's Configure step. When enabled, the scanner gains a side mission: during each scan, the model looks for clear, actionable product issues – bugs, crashes, design flaws, or significant UX friction – and reports them as findings.
The scanner's primary task (monitoring, classifying, scoring, or summarizing) is unaffected. The side mission runs alongside it, and most scans produce no finding at all. The bar is deliberately high: a finding must be self-contained and concrete enough for someone with no session context to act on it.
Findings are emitted as signals to the self-driving inbox, where Responder agents can pick them up, research the issue against your codebase and product data, and potentially open a PR.
The toggle is the only setup required – there's no additional configuration in PostHog Desktop Inbox for this source. Once a scanner has emitted signals, the card shows how many it has emitted and how many reports and PRs they contributed to.