


How to set up Ruby on Rails analytics, feature flags and more

Contents
Ruby on Rails is a popular fullstack web framework used by companies like Shopify, GitHub, Twitch, and more.
In this tutorial, we build a basic Ruby on Rails app, add PostHog to it, and then set up some of the key features of PostHog, such as custom event capture, user identification, and feature flags.
Already know how to build a Ruby on Rails app? Skip to the PostHog integration step.
1. Creating a basic Ruby on Rails app
First, install Ruby. I used rbenv and a ~/.bash_profile to install version 3.1.3 but there are many ways you can do it. After installing the right version of Ruby, install Rails.
Once done, we can start our blog by running the rails new command, go into the blog folder, and starting the server.
Going to localhost:3000 pulls up a site that looks like this:
A more detailed version of this Ruby app building process is in the Getting Started with Rails guide.
Setting up the articles routes
Rails is nice because it has a bunch of commands you can use to generate parts of the app. Use generate controller to create the controller for our articles:
We skip the routes because we will set those up manually. In config/routes.rb, add details to the route. The resources method lets us define a bunch of routes we want all at once:
Creating the article model
Like the controller, the models have commands to generate them as well. We want our article to have a title, body, and author so run the command:
Then migrate these changes to our database by running:
Once done, launch the Rails console by running:
Then create an article by running these commands in the rails console:
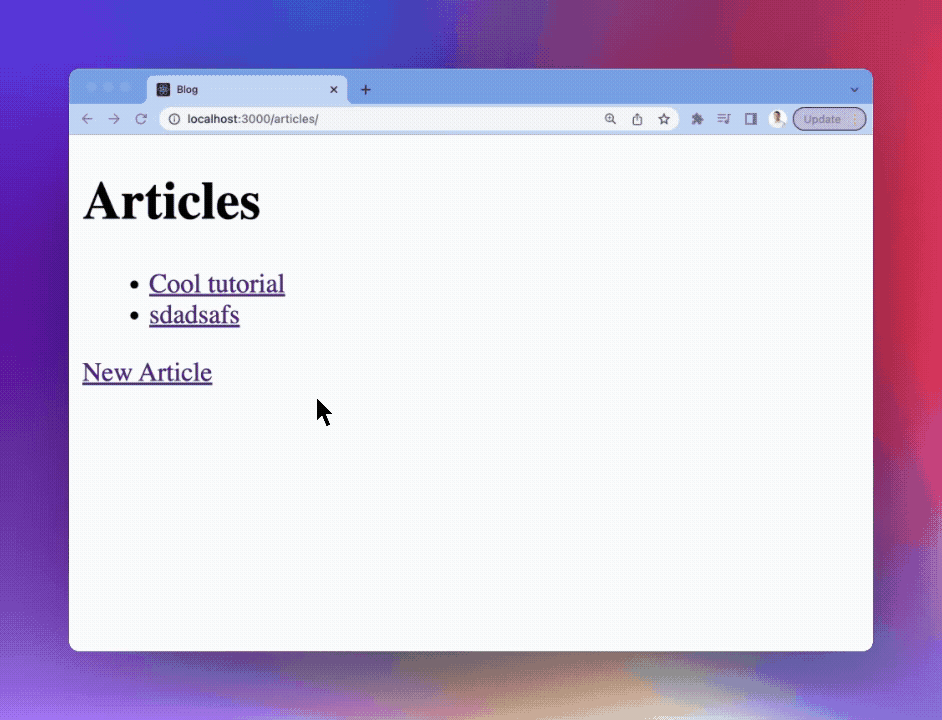
Showing our articles
With the routes, controller, and model all set up, it is time to actually show the articles. In app/controllers/articles_controller.rb, set up a function to get all the articles and individual routes for each of them:
Next, add the code to show them all, go to the details about them, and create a new one (which we’ll set up next) in a new file at app/views/articles/index.html.erb:
Also, set up the details page in a new file at app/views/articles/show.html.erb:
Creating new articles
The last thing to do is add the ability to create a new article. First, in app/controllers/articles_controller.rb, add a new and create function. We want to define the article params in another function to ensure title, body, and author are all included in the request as well:
Next, create a new form page for article creation in app/views/articles/new.html.erb:
You should now have a nice Ruby on Rails app with a home page, article pages, and the ability to add new articles. Customize it further if you'd like, then when you're ready it's time to add PostHog.
2. Integrating the PostHog snippet and Ruby library
Now our Ruby on Rails app is ready to integrate with PostHog. There are two ways to do this; with the snippet, or the library.
- The first method enables you to quickly get started with most PostHog features, such as analytics and session recording.
- If you also want to use advanced tools, such as feature flags and experiments, you need to use the library.
Adding the JavaScript snippet
This tutorial uses the JavaScript snippet. This provides autocapture of events, pageviews, session recordings, and more.
To set it up, copy the code snippet from the PostHog docs and add it to views/layouts/application.html.erb. With no other changes, this file looks like this:
Make sure to turn on session recordings in your PostHog project settings by scrolling down to Session replay and toggling on Record user sessions.
Once you've set this up and clicked around on the server, you should see events in your PostHog instance from the source web.
Adding the Ruby library
If you want access to all the features of PostHog, including custom event capture, user identification, feature flags, and error tracking, you need the Ruby library.
To set this up, add posthog-ruby and posthog-rails to your Gemfile:
Then install the gems and run the PostHog install generator:
This creates config/initializers/posthog.rb with sensible defaults. Open it and add your project token and instance URL:
You can find your project token and instance address in your project settings.
Now, you can call PostHog throughout your Ruby on Rails application to access all the features of PostHog.
3. Using PostHog in your Ruby on Rails app
With both the library and snippet set up, we can use both of them to capture events, identify users, and use feature flags.
Capturing custom events
The client-side JavaScript snippet provides autocaptures of pageviews, clicks, inputs, and some other events. If you want to capture events which are more nuanced or unique to your product, you must set up custom event capture using the Ruby library.
If you want to capture when someone submits a new article, you can call PostHog.capture() with the author string and an event name you choose. In app/controllers/articles_controller.rb, this looks like this:
This creates an article_created event with a source of posthog-ruby.
Connecting frontend and backend identities
In your PostHog instance, you see that events are coming from two different people, one with an anonymous ID and another with an email. Even though both these "people" are you, they are treated as two separate people in PostHog, but you can combine them with an alias call.
To do this, you need both the distinct ID generated by the client side JavaScript snippet and the new distinct ID (email) from the author string. We can get the distinct ID when we save the article (like we did for custom event capture) and the anonymous ID via the cookies in the request. We also need our project API to get the right cookie.
Altogether, this looks like this:
PostHog client SDKs automatically generate an anonymous ID for users. When you call identify on the client, the anonymous ID is merged with a new distinct ID.
When possible, prefer identifying the user on the client-side when they register or login. Aliasing should be reserved for cases where your user has a server-only distinct ID that is not available on the client.
You should see an Alias event in your PostHog instance, and when you check the person, you should see their distinct ID and anonymous IDs connected. All valid aliases will point to the same person in PostHog.
Using feature flags
You can also set up feature flags. We will set up a feature flag to redirect to the homepage instead of the article details.
First, create the flag in PostHog. You can do so in Feature Flags. Click New feature flag, add a key (I chose home-redirect):
- Under Evaluation runtime, select Both client and server.
- Under Served value, select Boolean.
- Under Release conditions, slide to 100% of users.
- Finally, click Save.
Once done, we can check for this flag in our Ruby code and redirect to the home page if it is active. Again, we need the distinct ID to call is_feature_enabled(), so use the author string.
You can then turn off the flag to check that it is redirecting back to the article and modify the conditions how you like. Just remember, if you configure the flag to filter by person properties, you must call identify() on users with the properties before you can use them in your release conditions.
4. Capturing errors
PostHog can also capture errors from your Ruby on Rails app. There are two approaches: client-side and server-side.
The JavaScript snippet you added earlier automatically captures frontend errors (like uncaught JavaScript exceptions in the browser). No extra setup is needed for this.
For backend errors (exceptions raised in your controllers, models, or background jobs), the posthog-rails gem you installed earlier provides automatic exception tracking. It hooks into Rails' middleware and error reporter, so crashes in your controllers or ActiveJob workers are captured without any extra code.
Enable exception tracking in your config/initializers/posthog.rb:
With this enabled, unhandled exceptions in your controllers and background jobs are automatically sent to PostHog. You can also capture exceptions manually anywhere in your code:
For full details, see our Rails error tracking installation guide and the Rails library docs.
Once done, you have a basic Ruby on Rails app with many of the key features of PostHog set up. You can customize it to your liking. There are also more PostHog features to explore like group analytics, user and event properties, and experiments. Read more in our Ruby documentation.
Further reading
- What to do after installing PostHog in 5 steps
- How to set up A/B tests in Ruby on Rails
- Complete guide to event tracking

Subscribe to our newsletter
Product for Engineers
Read by 100,000+ founders and builders
We'll share your email with Substack
PostHog is the leading platform for building self-driving products. With a full suite of developer tools – AI observability, product analytics, session replay, feature flags, experiments, error tracking, logs, and more – PostHog captures all the context agents need to diagnose problems, uncover opportunities, and ship fixes. A data warehouse and CDP tie it all together, unifying that context into one source agents can read across. You can steer it all from Slack, the web app, the desktop (PostHog Code), or your own editor via the MCP.